A mirror is one of those bathroom details that looks simple until you get it wrong. Hang the wrong size, pick a frame that clashes with your fixtures, or mount it two inches too low — and suddenly the whole vanity feels off. Framed bathroom mirrors fix a lot of those problems before they start. The frame sets the scale, anchors the style, and gives you a clear visual boundary above the sink. Whether you’re doing a full renovation, refreshing a dated builder-grade mirror, or just trying to make sense of the options, this guide covers everything: what makes framed mirrors different, when they’re the right call, which materials and shapes actually work in humid spaces, how to size them correctly, and how to install or DIY your own frame without a professional.
Framed vs. Frameless Explained
A framed bathroom mirror is any wall mirror with a border — wood, metal, resin, tile, or composite — that wraps around the glass edge. The frame is structural in some cases and purely decorative in others, but its main job is to define the mirror as an object in the room rather than a flat panel on the wall.
A frameless mirror is a single sheet of mirrored glass, usually cut to size and mounted with clips, adhesive, or a flush channel. The glass edges are polished or beveled, and there’s nothing interrupting the perimeter.
The practical differences matter more than most people expect:
| Feature | Framed Mirror | Frameless Mirror |
|---|---|---|
| Visual weight | Defined, intentional | Light, recessive |
| Style range | Traditional to modern | Mostly modern/minimal |
| Installation | Hang like a picture frame | Clips, adhesive, or channel mount |
| Edge protection | Frame covers and protects glass edges | Edges exposed, polished |
| Moisture risk | Frame material must handle humidity | No frame to deteriorate |
| Price range | Wide ($50–$800+) | Mid to high ($100–$600+) |
| Customization | High — frame material, finish, color | Limited — size and edge profile |
| Best for | Rooms needing a design focal point | Clean, minimalist spaces |
Image prompt: Flat-lay comparison of a warm wood-framed rectangular bathroom mirror next to a polished frameless mirror of the same size, both photographed from straight above on a white marble surface, bright natural light.
The simplest rule: if you want the mirror to contribute to your room’s style, go framed. If you want it to disappear into the design, go frameless.
Pros of Framed Bathroom Mirrors
Framed mirrors aren’t just a style choice — they solve real problems in bathroom design.
They anchor the room. A frame gives the mirror visual weight and purpose. It reads as furniture rather than an afterthought, which helps in bathrooms that otherwise feel bare or disconnected.
The design options are genuinely wide. Wood, metal, bamboo, resin, tile — each material behaves differently and fits different interiors. A black steel frame reads industrial. A white-painted wood frame reads farmhouse. A thin brass frame reads contemporary. That range doesn’t exist with frameless mirrors.
Frames tie your finishes together. If your faucet is brushed nickel, a brushed nickel frame echoes that finish and creates a cohesive look without having to match everything perfectly. The same logic applies to cabinet hardware, towel bars, and light fixtures.
Frames conceal clips and channels. Builder-grade mirrors are often held in place with metal clips or bottom channels that are difficult to hide. A frame covers all of that cleanly.
Installation is straightforward. Most framed mirrors hang on a wire or bracket exactly like a picture frame. No special clips, no precise wall prep, no adhesive waiting period.
They work on rentals. Because framed mirrors hang with standard picture hooks, they’re removable without damaging walls — a real advantage if you’re renting.
Cons of Framed Bathroom Mirrors
No mirror type is perfect. Here’s where framed mirrors fall short:
- Moisture is the main enemy. Wood frames can warp, crack, or grow mold in high-humidity bathrooms without proper sealing. Even metal frames can corrode at unsealed joints over time.
- They take up more wall space. A 2-inch frame on all sides adds 4 inches to the total width and height. In a small bathroom, that matters.
- Frames collect dust and product residue. The ledge created by a frame catches toothpaste spray, hairspray, and bathroom fog. Frameless mirrors wipe clean in one pass.
- Quality varies a lot. An inexpensive resin frame can look fine in photos and feel flimsy in person. The price range for framed mirrors is wide, and the lower end shows.
- Not ideal for very modern bathrooms. In spaces built around clean surfaces and zero visual noise — floating vanities, large-format tile, minimal hardware — a frame can feel like extra information the room doesn’t need.
When to Choose a Framed Bathroom Mirror
Use a framed mirror when:
- Your bathroom has a defined style — farmhouse, transitional, traditional, coastal, or industrial — and you want the mirror to reinforce it.
- You’re working with painted cabinetry, and you need the mirror frame to complement or contrast the cabinet color.
- Your faucets and hardware have a strong finish (matte black, brushed gold, oil-rubbed bronze) and you want the mirror to carry that finish into the upper half of the wall.
- You’re refreshing a dated builder-grade bathroom without a full renovation. A framed mirror over an existing basic mirror (or a DIY frame applied to it) changes the room faster than almost any other update.
- You want the mirror to work as wall art, particularly in a powder room where the mirror is more decorative than functional.
Consider frameless instead when:
- You have a very small bathroom and need the mirror to feel as open as possible.
- Your aesthetic is strictly minimalist and you want nothing to interrupt the wall plane.
- You’re pairing the mirror with floating hardware, frameless shower enclosures, and handleless cabinetry.
Framed Bathroom Mirror Frame Materials
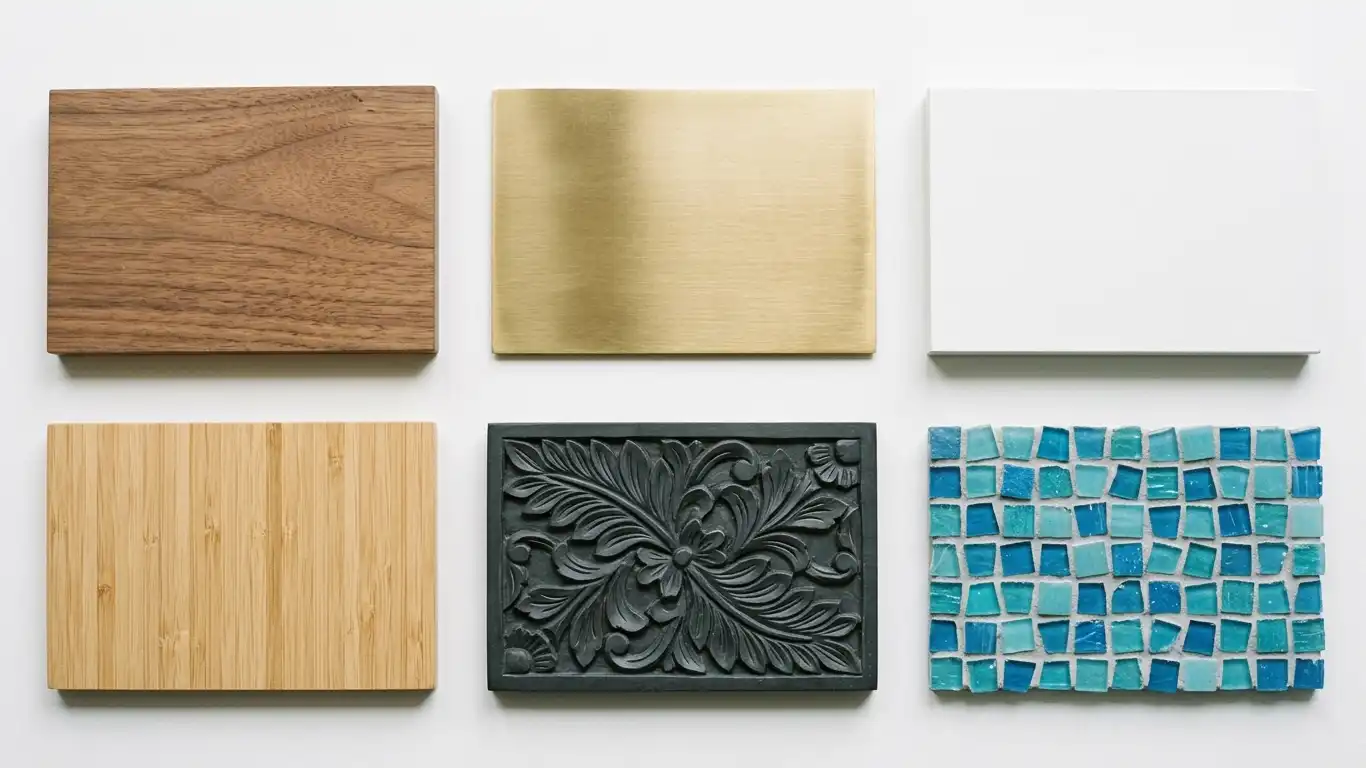
The frame material determines how the mirror ages, how it handles moisture, and how much maintenance it needs. Here’s a practical breakdown:
Wood Frames
Wood frames bring warmth that no other material replicates. Oak, walnut, bamboo, and pine all read differently — lighter woods feel casual and Scandinavian, darker ones feel more traditional and formal. The critical requirement is proper sealing. Unsealed wood in a shower-adjacent bathroom will warp within months. Look for frames described as “moisture-resistant” or “sealed finish,” and avoid placing them in bathrooms without ventilation. Reclaimed and distressed wood frames work especially well in farmhouse and coastal designs.
Metal Frames
Metal is the most practical choice for bathrooms. Aluminum, stainless steel, iron, and brass all resist moisture when finished correctly. Brushed nickel and chrome work in modern and transitional spaces. Matte black steel reads industrial or contemporary. Brass and gold tones lean traditional or glam. Metal frames are easy to clean — a damp cloth handles most residue — and they don’t warp. The tradeoff is that cheaper metal frames can corrode at joints or scratches over time.
Aluminum Frames
A subset of metal frames worth mentioning separately. Aluminum is lightweight, rust-proof, and takes a wide range of finishes. It’s one of the most common frame materials for bathroom mirrors sold at retail, partly because it tolerates humidity well even without special treatment.
Acrylic and Plastic Frames
Lightweight, moisture-immune, and inexpensive. Plastic and acrylic frames won’t warp, rust, or mold, which makes them practical for bathrooms used by children or in rental properties. The main limitation is that they can look cheap at close range, especially in finishes trying to imitate wood or metal.
Bamboo and Rattan Frames
Both have become more common as natural, eco-conscious design options. Bamboo is naturally moisture-resistant and harder than most common woods, making it a solid choice even in humid bathrooms. Rattan has a looser, woven texture that works well in bohemian or coastal-inspired spaces. Both pair well with natural stone tile, linen textiles, and warm-toned lighting.
Resin Frames
Resin can be molded into almost any shape, making it a good choice for ornate or carved-style frames at a lower price point than actual carved wood. It’s moisture-resistant and paintable. Quality varies widely — high-density resin is durable, but lightweight resin frames can feel hollow.
Tile and Mosaic Frames
Less common but visually striking. Tile or mosaic frames are often custom-built to match the bathroom’s wall or floor tiling, which creates a completely cohesive look. They’re heavy and permanent, so they’re typically chosen during a full renovation rather than a refresh.
| Frame Material | Moisture Resistance | Maintenance Level | Price Range | Best Style Match |
|---|---|---|---|---|
| Sealed wood | Medium | Medium | Farmhouse, traditional, coastal | |
| Metal (stainless/aluminum) | High | Low | Modern, industrial, transitional | |
| Bamboo | High | Low | $ – $$ | Coastal, bohemian, natural |
| Rattan | Medium | Medium | $ – $$ | Bohemian, coastal |
| Acrylic / plastic | Very high | Very low | $ | Budget, rental, kids’ bath |
| Resin | High | Low | $ – $$ | Traditional, ornate |
| Tile / mosaic | Very high | Medium | Custom, maximalist |
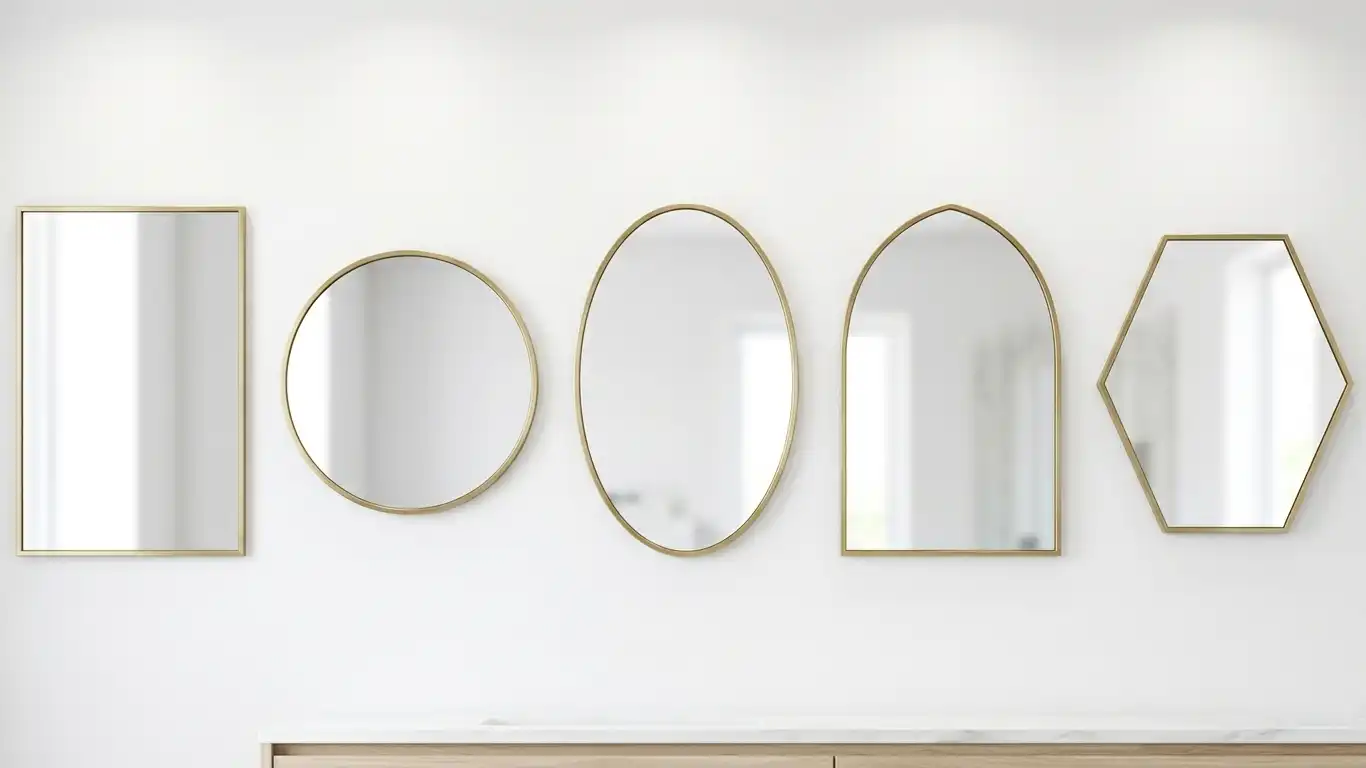
Framed Bathroom Mirror Shapes
Shape affects how the mirror reads in the room and how it interacts with the vanity, lighting, and wall space. Most framed mirrors fall into a few categories:
Rectangular is the default for good reason. It aligns with the horizontal lines of the vanity, maximizes usable reflection area, and works in virtually every bathroom style. It’s the practical choice for double-sink vanities because it can span the full width.
Round and oval mirrors have become significantly more popular over the past few years because they soften the hard geometry of most bathrooms. Round mirrors work well as a single statement piece above a single sink. Oval mirrors have a similar effect but add a slight vertical elongation that suits narrower walls. Both work better for style-forward bathrooms than for highly functional shared bathrooms where surface area matters.
Arched mirrors sit between rectangular and round — they have the height and usable reflection of a rectangle but the softer silhouette of a curved top. They’re particularly popular in traditional and transitional bathrooms and work well in rooms with arched architectural details.
Geometric shapes (hexagon, octagon, irregular) are accent pieces more than primary mirrors. They work well in powder rooms where the mirror is more decorative than functional, or as a secondary decorative mirror in a larger bathroom.
| Shape | Best For | Avoid When |
|---|---|---|
| Rectangle | Wide vanities, double sinks, functional baths | — (universally versatile) |
| Round | Single sinks, statement pieces, modern baths | Very wide vanities |
| Oval | Narrow walls, single sinks, traditional baths | Double vanity |
| Arched | Traditional, transitional, high-ceiling baths | Very low ceilings |
| Geometric | Powder rooms, accent positions | Primary functional mirror |
How to Size a Framed Bathroom Mirror
Getting the size right is the part most people rush — and regret later. The mirror’s width relative to the vanity, its height from the countertop, and its clearance from the ceiling all affect how the finished wall looks.
Width
The standard rule: the mirror should be 2–4 inches narrower than the vanity on each side. For a 36-inch vanity, that means a mirror 28–32 inches wide. The reason is proportion — a mirror that matches or exceeds the vanity width makes the vanity look smaller by comparison.
If you’re mounting wall sconces on either side of the mirror, leave at least 3 inches of wall between the mirror edge and each sconce. That keeps the light source visible and prevents shadows falling directly onto the glass. For help with exact placement measurements, the guide on bathroom mirror height walks through the vertical variables in detail.
Height
Position the bottom edge of the mirror 5–10 inches above the countertop or backsplash. This keeps it out of splash range and creates visual breathing room between the vanity surface and the glass. The top edge should sit at least 4–6 inches below the ceiling, or below any overhead lighting if there’s a ceiling fixture directly above.
Single Vanity Size Guide
| Vanity Width | Recommended Mirror Width |
|---|---|
| 24 inches | 18–20 inches |
| 30 inches | 24–26 inches |
| 36 inches | 28–32 inches |
| 48 inches | 40–44 inches |
| 60 inches | 52–56 inches |
Double Vanity: One Mirror or Two?
A single wide mirror over a double vanity creates a seamless, hotel-like look and reflects more light. Two separate mirrors — each centered over one sink — create symmetry and give each person their own space. There’s no wrong answer; the choice usually comes down to the room’s style and whether the vanity is symmetrical.
If you go with two mirrors, each mirror should be 2–4 inches narrower than the space above its respective sink. Leave 2–4 inches of wall between the mirrors so they read as two separate objects rather than one interrupted surface.
Note on framed mirror sizing: When measuring a framed mirror, confirm whether the listed dimensions include the frame. A mirror listed as 30 × 36 inches might have a glass surface of only 26 × 32 inches inside a 2-inch frame. Always check both dimensions before ordering.
How to Install a Framed Bathroom Mirror
Most framed mirrors weigh between 10 and 30 pounds, which puts them well within the range of a standard DIY wall mount. The process is similar to hanging a heavy picture frame.
What You’ll Need
- Stud finder
- Level (laser or bubble)
- Drill and drill bits
- Wall anchors (if not mounting into studs)
- Screws rated for the mirror’s weight
- Pencil
- Measuring tape
Steps
1. Find your studs. Run the stud finder across the wall and mark stud locations with a light pencil mark. If your mirror’s width spans at least one stud, use it. If not, use drywall anchors rated for at least 1.5x the mirror’s weight.
2. Mark the hanging position. Measure up from the countertop 5–10 inches to find the bottom edge of the mirror. Add the mirror height to find where the top edge will sit. Check that this position clears your ceiling and any overhead light fixture.
3. Locate the hanging hardware. Flip the mirror over and check the back. Most framed mirrors have a wire stretched between two D-rings, a keyhole slot, or a French cleat. The type of hardware determines where exactly you place the wall hook or screws.
4. Mark and drill. Use your level to mark the exact screw or hook position on the wall. Drill pilot holes if going into studs; tap drywall anchors if not.
5. Hang and level. Hang the mirror and use your level to confirm it’s straight before tightening everything completely. Step back and check the gap above the vanity from a distance — small adjustments are easier now than after the drill holes are fixed.
6. Check the weight rating. Every anchor and hook has a weight rating. Confirm that your hardware can safely hold the mirror, especially for larger pieces.
For specific guidance on height placement in different bathroom configurations, see this guide on proper bathroom mirror height.
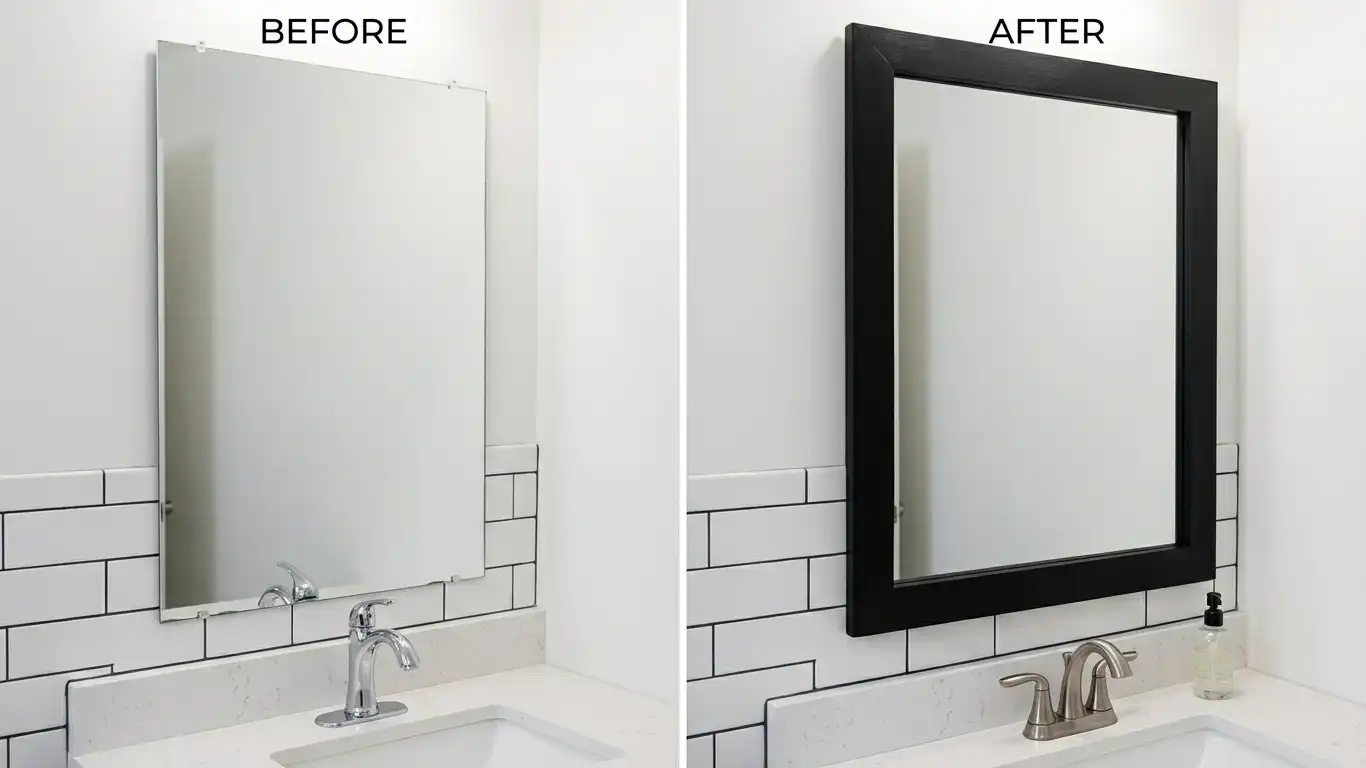
How to Frame an Existing Bathroom Mirror
If you have a builder-grade mirror — a plain rectangular panel mounted with metal clips — you can frame it without removing it from the wall. The result looks like a professionally framed mirror and costs between $15 and $60 in materials depending on size.
What You’ll Need
- Wood boards (1×4 or 1×3 common board, or decorative molding)
- Miter saw or miter box and hand saw
- Wood glue
- Construction adhesive (Liquid Nails or similar)
- Painter’s tape or clamps
- Sandpaper (120 and 220 grit)
- Paint, stain, or clear seal finish
- Small washers (to replace mirror clips, optional)
Step-by-Step
1. Measure the mirror. Measure the outside dimensions of the glass panel — not the wall, and not to the clips. Write down width and height.
2. Cut the boards. Cut four pieces with 45-degree miter cuts at each corner so the outside edge of each board aligns with the outer edge of the mirror. Dry-fit the pieces on a flat surface before any glue is applied.
3. Sand and finish. Sand all surfaces before assembly. Apply paint or stain and let it dry fully. Finishing before assembly is easier than finishing after.
4. Handle the mirror clips. If the clips sit proud of the mirror surface, they’ll prevent the frame from lying flat. The simplest solution: remove each clip one at a time, slide a small flat washer behind it, and reattach. The washer holds the mirror while reducing the clip’s profile to nearly nothing.
5. Glue the frame to the mirror. Apply construction adhesive in a zigzag pattern to the back of each board, staying away from the edges. Press each piece firmly against the mirror and hold with painter’s tape or spring clamps. Allow 24 hours to cure.
6. Fill corner gaps. Once dry, check the miter joints. Small gaps can be filled with wood filler, caulk, or a tiny amount of wood glue. Sand smooth and touch up the finish.
Frame Style Options
| Style | Material | Finish | Best For |
|---|---|---|---|
| Painted wood | 1×4 common board | Matte black or white | Modern, farmhouse |
| Stained wood | 1×3 or 1×4 oak/pine | Natural or walnut stain | Traditional, warm interiors |
| Molding frame | Decorative casing molding | Paint or stain | Traditional, transitional |
| Stick-on frame kit | Pre-cut MDF with adhesive | Various | Renters, quick update |
Budget note: A 36 × 30-inch DIY frame costs roughly $20–$35 in lumber and $5–$10 in adhesive and finishing supplies. Pre-made frame kits for existing mirrors run $60–$150 depending on size and material.
Framed Bathroom Mirror Design Ideas & Style Inspiration
The frame style you choose works as shorthand for the room’s entire aesthetic. Here are the most practical pairings:
Modern and Minimalist
Thin metal frames in matte black or brushed nickel sit nearly flush with the wall and add just enough definition without competing with anything else. Rectangular shapes work best. Keep the frame no wider than 1–1.5 inches. Pair with simple linear sconces on either side. If you want the lighting integrated rather than flanking the mirror, an LED bathroom mirror gives you even, shadow-free light without adding wall hardware.
Farmhouse and Rustic
White-painted wood frames, natural barn wood, or distressed finishes define this look. Arched or rectangular shapes both work. The frame should be wider — 2–3 inches — to carry visual weight against shiplap, subway tile, or painted brick walls. Paired with matte black hardware and vintage-style fixtures.
Traditional and Classic
Carved resin, gilded frames, or dark wood with beveled detailing. Oval and arched shapes are most common here. The frame becomes a focal point, so don’t undersize it. Pair with brushed gold or oil-rubbed bronze fixtures and warm lighting.
Industrial
Dark steel or iron frames with visible weld joints or rivets. Usually rectangular. Works best in bathrooms with concrete tile, raw wood vanities, and exposed black hardware. The mirror often sits without any additional decorating around it.
Double Vanity: The Symmetrical Setup
Two matching framed mirrors, one centered over each sink, with wall sconces mounted between them or on the outer edges — this is the classic hotel-bath look and it works in almost any style. For an upgrade that adds integrated lighting without changing the framed aesthetic, the LED vanity mirror range includes options that pair cleanly with this layout.
Small Bathroom Tips
- Use a vertically oriented rectangular or arched frame to draw the eye upward and make ceilings feel higher.
- A single round mirror above a small pedestal sink feels less crowded than a large rectangle.
- Keep the frame thin and light-colored in very small spaces — heavy frames read smaller.
- Placing the mirror across from a window doubles the natural light in the room.
For those considering integrated lighting alongside a framed design, the LED mirror selection guide covers how to evaluate light color temperature, brightness, and anti-fog features in detail.
Conclusion
Framed bathroom mirrors do more visual work than most people expect. Choosing the right one means matching the frame material to your bathroom’s humidity level, sizing the mirror to your vanity rather than your wall, and letting the frame style reinforce whatever aesthetic the room is already building toward. The DIY framing option makes the upgrade accessible even on a tight budget. Whatever direction you go — wood, metal, arched, rectangular, fully purchased or hand-built — the principles stay the same: right size, right material, right frame for the style. Get those three things aligned and the mirror takes care of the rest.
Frequently Asked Questions
What is the best frame material for a framed bathroom mirror in a high-humidity bathroom?
Aluminum, stainless steel, and properly sealed bamboo handle moisture better than untreated wood. If you prefer a wood look, choose a frame described as moisture-resistant with a lacquered or polyurethane finish, and ensure your bathroom has adequate ventilation.
How wide should a framed bathroom mirror be compared to the vanity?
The standard recommendation is 2–4 inches narrower than the vanity on each side. For a 48-inch vanity, that means a mirror roughly 40–44 inches wide. Include the frame in your measurement — the overall mirror width, not just the glass, should follow this proportion.
Can I add a frame to my existing bathroom mirror without removing it from the wall?
Yes. You can glue wood boards directly onto the face of an existing wall-mounted mirror using construction adhesive. Replace the mirror clips with small washers first so the boards lie flat. The process takes a few hours and costs under $50 in most cases.
What is the difference between a framed and semi-frameless bathroom mirror?
A framed mirror has a continuous border on all four sides. A semi-frameless mirror typically has a frame on the top and sides only, with the bottom edge left open — often used when the mirror sits directly on a backsplash and a full bottom frame would be impractical.
Are framed bathroom mirrors harder to clean than frameless mirrors?
Slightly. The glass cleans the same way, but the frame requires separate attention — especially in the joint between the frame and the glass where toothpaste and spray can accumulate. Wood frames need to be wiped dry rather than left wet. Metal frames generally need only a quick wipe. For day-to-day use, the added cleaning time is minimal.