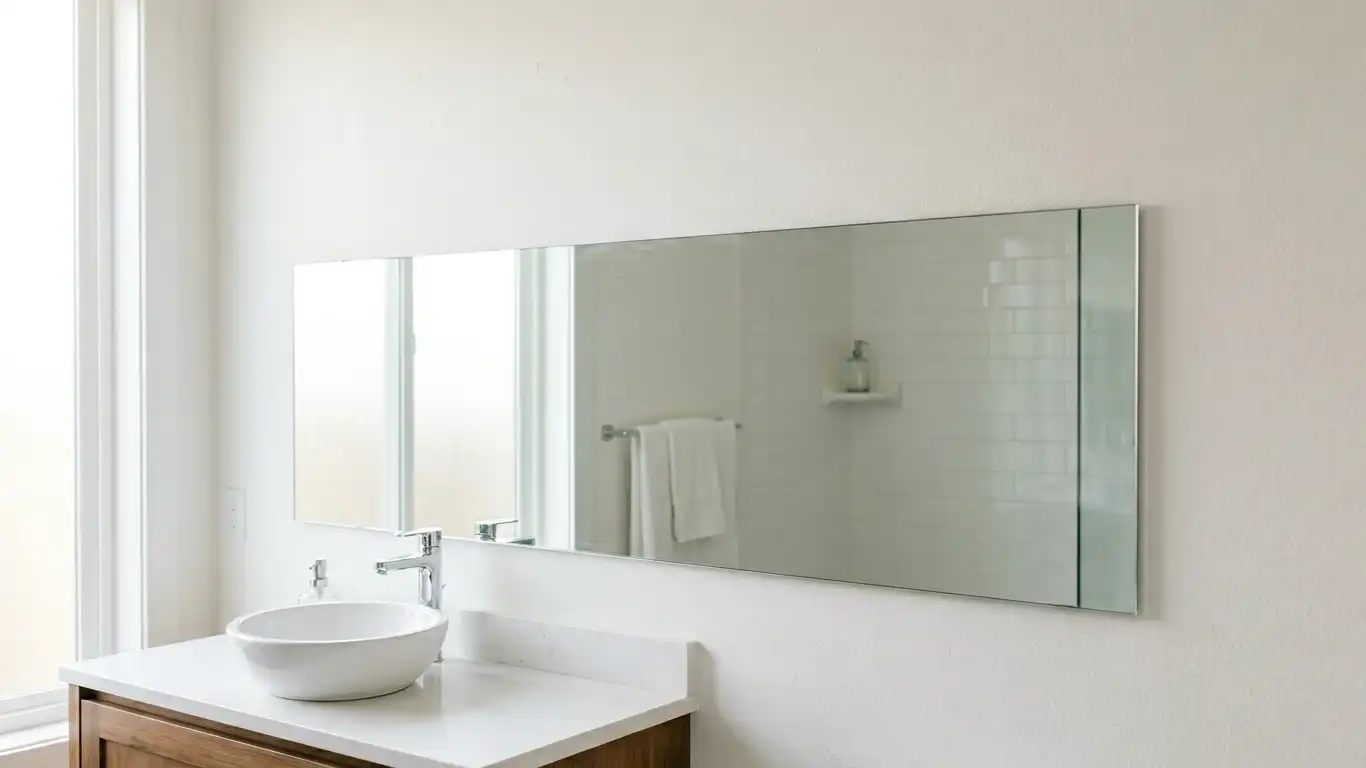
That big bathroom mirror seemed like a great idea when it went up. Now you want it gone — but there are no clips, no brackets, and no obvious way to get behind it. If you’ve been wondering how do you remove a mirror glued to the wall without wrecking the drywall or sending glass flying across the room, you’re in the right place. This guide walks through everything: the adhesive type you’re dealing with, how your wall material changes the approach, three proven removal methods compared side by side, and exactly what to do once the mirror is down.
Identify the Adhesive
Before you pick up a single tool, take a close look at the edges of the mirror. The type of adhesive holding it to the wall determines how hard this job will be and which removal method actually works.
Mirror Mastic (Black Construction Mastic)
This is the most common adhesive used on bathroom mirrors installed before 2010. It looks like a black, tar-like substance and typically goes on in blobs — one near each corner and one in the center. Mirror mastic responds well to heat, which is why the heat-and-pry method works so reliably on older installations.
Silicone Adhesive
Silicone is clear or white and rubbery. You’ll see it as a continuous bead or in strips rather than blobs. Heat barely softens it — silicone stays elastic even at high temperatures. For silicone, cutting through it with a wire saw or a sharp utility knife is far more effective than heating.
Construction Adhesive (e.g., Liquid Nails)
Tan or beige in color, construction adhesive bonds extremely hard and tends to cure into a near-rigid mass. It’s the most stubborn of the three. Heat helps but usually not enough on its own — a chemical adhesive remover (Goo Gone, WD-40, or mineral spirits) is often needed as well.
How to Quickly Identify Which One You Have
| Clue | Likely Adhesive Type |
|---|---|
| Black residue at edges, blobs visible | Mirror mastic |
| Clear or white rubbery lines | Silicone |
| Tan/beige, very hard to scrape | Construction adhesive |
| Mirror installed before ~2005 | Mastic (most common) |
| Mirror installed post-2015 | Silicone or construction adhesive |
Understand Your Wall Type
The wall behind the mirror affects how much damage is likely and what tools to use.
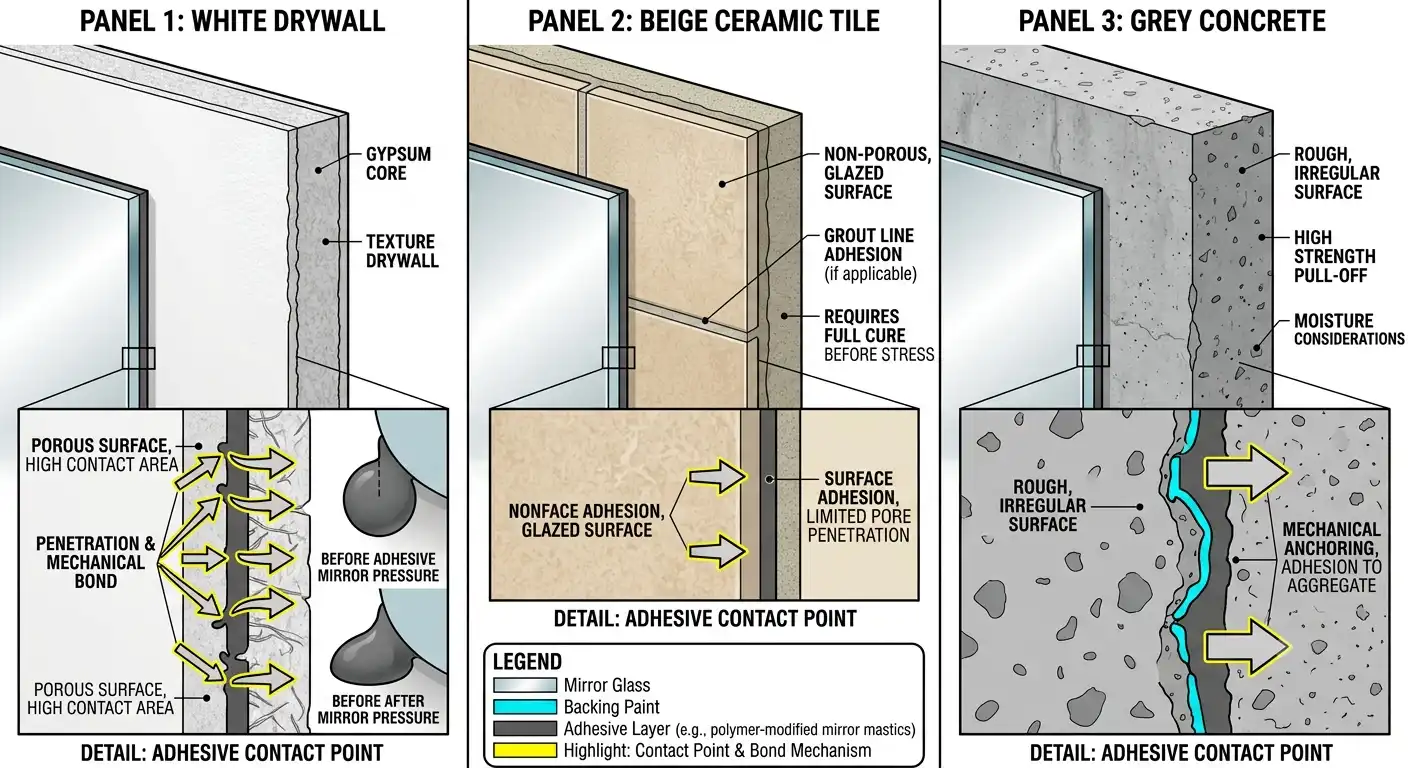
Drywall (Gypsum Board)
The most common scenario in North American and European homes. Drywall is easy to damage — the paper facing tears away with the adhesive if you pry too aggressively. Keep your blade angle low (under 20°) and work slowly. If some paper tears, it’s fixable. If you gouge into the gypsum core, you have a larger repair job.
Ceramic or Porcelain Tile
Tile is harder and less likely to gouge, but the glazed surface can scratch or chip. Never use a metal pry bar directly on tile. Adhesive between tile and mirror often sets harder than on drywall because tile is non-porous. A wire saw is the best first approach on tiled walls.
Concrete or Brick
Adhesive bonds to concrete more aggressively than to drywall. The mirror may come off cleanly, but residue will be very difficult to remove. Chemical solvents tend to be necessary. The wall itself, however, is nearly impossible to damage with standard tools — so you can apply more pressure without worrying.
If the Mirror Has Been There for 20+ Years
Old mirrors need their own section because aged adhesive behaves unpredictably — and often opposite to what you’d expect.
Brittleness vs. rock-hard curing. Some older mastic dries out and becomes brittle over decades, which actually makes removal easier — the adhesive cracks and releases on its own with minimal prying. But in damp environments like bathrooms, mastic can instead cure into an almost concrete-like mass that’s harder than fresh product.
Drywall paper fusion. After many years, mastic can essentially become part of the drywall paper layer. When you pry the mirror, the paper comes with it. Assume this will happen and don’t fight it — just pry slowly and patch the wall afterwards.
Heat response is reduced. Heat still helps, but older adhesive may need longer exposure. Keep the heat gun or hair dryer on a section for 3–4 minutes instead of the usual 1–2 before you test with a putty knife.
When to give up on preserving the mirror. If the adhesive has fully fused with the mirror’s reflective backing and sections won’t release cleanly after 20 minutes of work, breaking the mirror intentionally and removing the pieces is often the most practical path.
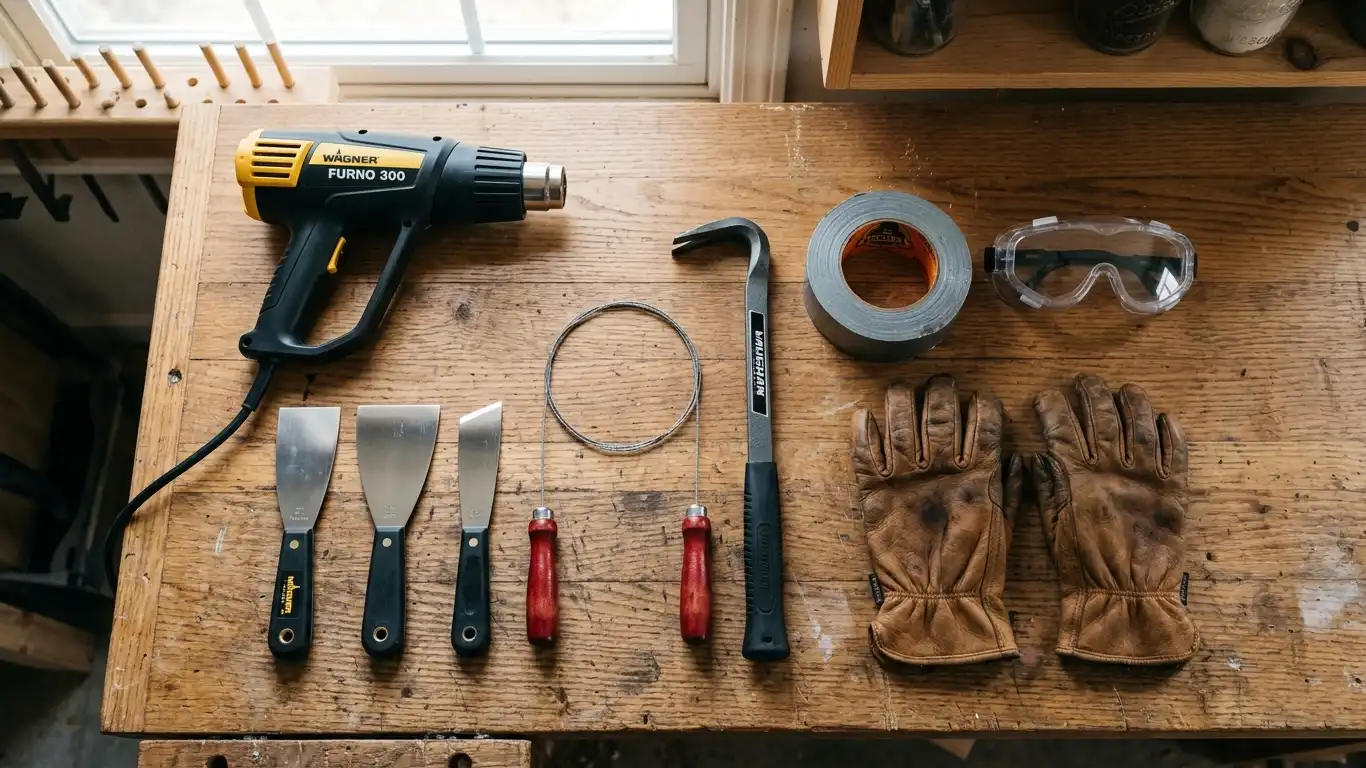
Tools You’ll Need
Gather everything before you start. Stopping mid-removal to search for tools increases the risk of the mirror shifting unexpectedly.
Essential Tools
- Heat gun or hair dryer — A heat gun (around $25–$40) reaches higher temperatures and works faster than a hair dryer. Either gets the job done.
- 3-inch and 6-inch putty knives — Use the narrow one to locate adhesive, the wide one to widen the gap.
- Small pry bar — For applying controlled leverage once the gap is established.
- Wire saw — Piano wire, picture-hanging wire, or a windshield removal wire all work. Length should exceed the mirror’s widest dimension.
- Utility knife — For scoring silicone edges or cutting around the mirror perimeter.
Safety Gear (Non-Negotiable)
- Heavy leather or cut-resistant gloves
- Safety glasses or goggles
- Long-sleeve shirt and closed-toe shoes
- Dust mask if using chemical solvents
Supporting Materials
- Duct tape or painter’s tape — Cover the entire mirror surface in a crisscross grid before you start. If it cracks, the tape holds pieces in place.
- Canvas drop cloth or thick cardboard — Lay it on the floor and countertop below the mirror.
- Cardboard box — For collecting broken glass.
- Adhesive remover — Goo Gone, WD-40, or mineral spirits for stubborn residue.
- Wood shims — Useful for large or heavy mirrors (see the large mirror section below).
Prepare the Work Area
Five minutes of prep saves a lot of cleanup.
- Clear the countertop and surrounding area. Remove everything within two feet of the mirror — toiletries, decor, soap dispensers, all of it.
- Lay the drop cloth. Cover the countertop, floor, and any surfaces below the mirror. Extend it at least 50 cm beyond the mirror’s sides.
- Cover the mirror with tape. Apply strips of duct tape in an X pattern across the entire mirror surface. This is the single most important safety step — it holds shards together if the glass cracks unexpectedly.
- Check ventilation. If you plan to use chemical adhesive removers, open a window or turn on the exhaust fan. Heat guns don’t require ventilation, but the fumes from some solvents do.
- Locate the circuit breaker for bathroom lights. If the mirror sits next to an outlet or light switch, know where to cut power if needed.
Three Removal Methods Compared
Pick the right method before you start. Switching mid-job after the mirror is already partially loose is risky.
| Method | Difficulty | Speed | Mirror Preserved? | Wall Damage Risk | Best For |
|---|---|---|---|---|---|
| Heat + Pry | Medium | Slow–Medium | Usually yes | Low | Most situations, mastic adhesive |
| Wire Saw | Medium–High | Medium | Yes | Very low | Silicone adhesive, mirrors worth keeping |
| Break and Remove | Low | Fast | No | Medium | Old mirrors, tight deadlines |
Quick decision guide:
- Want to keep the mirror intact → start with the wire saw method
- Standard bathroom mirror on drywall with mastic → heat and pry
- Mirror is cracked already or not worth saving → break and remove
- Mirror has silicone adhesive → wire saw, or utility knife + pry
Method 1: Heat and Pry (Best General Approach)
This is the right starting point for most glued mirrors, especially those installed with mirror mastic on drywall.
How it works: Heat softens the adhesive just enough to reduce its grip. A putty knife slips into the gap, locates each adhesive blob, and a pry bar gently levers the glass away from the wall.
Step-by-Step
Step 1 — Heat the first section. Start at a side or bottom corner, never the top (gravity is not your friend when the mirror releases). Hold the heat gun 10–15 cm from the mirror surface and move it slowly across a roughly 30 cm section for 2–3 minutes. The glass will feel warm to the touch.
Step 2 — Find the adhesive with the narrow knife. Slide the 3-inch putty knife behind the mirror edge at a low angle (15–20°). Move it laterally — when you hit a blob of adhesive, you’ll feel resistance. Mark that spot mentally.
Step 3 — Widen the gap. Partially insert the 6-inch putty knife to hold the gap open. Slip the pry bar in behind it, bracing against the knife rather than the wall. Apply slow, steady pressure — don’t jerk or force.
Step 4 — Repeat at each adhesive point. Mastic typically goes on in five blobs per mirror section — four corners and one center. Work around all of them before trying to remove the whole panel.
Step 5 — Pull the mirror free. Once every adhesive point has been loosened, grip the mirror at both sides and tilt it slowly forward. Have a helper ready to take the weight.
Notes by Adhesive Type
| Adhesive | Heat Duration Per Section | Extra Step Needed |
|---|---|---|
| Mirror mastic | 2–3 minutes | None |
| Silicone | Heat has limited effect | Switch to wire saw |
| Construction adhesive | 3–5 minutes | Add adhesive solvent |
Common mistakes to avoid:
- Holding the putty knife at too steep an angle gouges the drywall
- Skipping spots and trying to pry the whole mirror at once — it will crack
- Rushing after the first blob releases — other blobs are still holding

Method 2: Wire Saw (Best for Keeping the Mirror Intact)
If you want the mirror undamaged — either to reuse it or sell it — the wire saw method gives you the most control.
How it works: A length of wire is threaded behind the mirror and worked back and forth like a handsaw, cutting through the adhesive layer without touching the wall or the reflective backing.
What Wire to Use
- Piano wire or guitar string (strong, flexible)
- Windshield removal wire (purpose-built for exactly this task)
- Picture-hanging steel wire (works but clogs faster)
The wire needs to be longer than the widest dimension of the mirror. For a 90 cm mirror, use at least 120 cm of wire so you have enough to grip at both ends.
Step-by-Step
Step 1 — Thread the wire behind the mirror. Start at the top corner. Slide the wire over the mirror’s edge and down behind it. This is the hardest step — use a thin flathead screwdriver to gently lift the edge enough to feed the wire through.
Step 2 — Grip both ends. Wrap each end around a wooden dowel or thick glove for a firm grip. Have a second person hold the mirror against the wall so it doesn’t shift.
Step 3 — Saw with controlled strokes. Pull the wire in a back-and-forth motion while moving downward along the mirror. Keep it as flat against the wall as possible — angling it risks hitting the mirror backing.
Step 4 — Clear adhesive buildup. The wire will clog with adhesive after every 15–20 cm of progress. Wipe it clean with a rag before continuing, otherwise it grips and can snap.
Step 5 — Support the mirror as the last bond breaks. The mirror will release suddenly once the final adhesive section is cut through. Keep a hand or a helper in position to catch it.
Limitation: Wire saws struggle with construction adhesive thicker than about 1 cm. If progress stops entirely, switch to heat plus solvent first, then continue sawing.
Method 3: Break and Remove (Fastest, Highest Risk)
Use this method only when you have no intention of keeping the mirror and you want it gone quickly.
Before You Touch It
Double the tape coverage — wrap the mirror in overlapping horizontal strips of duct tape, then add diagonal strips. The goal is to prevent loose shards from flying when you strike. Put on your full protective gear: goggles, gloves, long sleeves.
Step-by-Step
Step 1 — Strike from a corner. Use a hammer and hit one corner of the mirror firmly enough to crack the glass, but don’t swing hard enough to drive the hammer through the drywall. A controlled, moderate tap is enough.
Step 2 — Work section by section. Once the glass is cracked, the adhesive-free sections will loosen and fall into the drop cloth. Use the putty knife to pry remaining pieces stuck to adhesive points.
Step 3 — Remove adhesive-locked fragments last. Some shards will be held firmly by adhesive blobs. Apply heat to each one individually, then pry loose with the putty knife.
Step 4 — Collect glass safely. Fold large pieces into the drop cloth before moving them. Place everything in the cardboard box and seal it. Label it “broken glass” before putting it in the trash.
Watch out for this: Mirrors with heavy mastic application can have sections that refuse to release even after the glass breaks. These fragments stay stubbornly attached to the wall and need to be treated individually with heat.
Removing Large or Heavy Mirrors
A mirror over roughly 60 × 90 cm or heavier than 10 kg needs a different approach. The main danger isn’t the prying — it’s the mirror releasing suddenly without support and falling forward.
Set Up a Safety Barrier First
Before doing anything else, place a sturdy step ladder on its side in front of the mirror, padded with a thick towel on top. This acts as a catch surface if the mirror drops unexpectedly. For a mirror above a vanity, the vanity countertop works as a natural ledge — place a folded towel on it.
The Shim Method (For Very Large Mirrors)
For mirrors exceeding 120 cm wide, a gradual approach using wood shims works better than direct prying:
- Insert 2–3 shims stacked together at the top corners of the mirror, gently tapping them in with a rubber mallet
- Add shims along the sides, one set every 30–40 cm
- Tap lightly and wait — you are trying to let the adhesive release gradually under tension
- Listen for popping sounds as each glue point lets go
- Do not force the shims deeper aggressively; slow consistent pressure is what works
Two-Person Removal
For anything over about 90 cm wide, always work with a partner. One person works the putty knife and heat gun while the other stands to the side — not directly in front — keeping both hands on the mirror. Once it releases, carry it away together.
Sectioned Removal for Full-Wall Mirrors
If the mirror runs from countertop to ceiling across the entire wall, consider sectioning it first. Score vertical lines through the glass with a glass cutter, then remove one column at a time. Each section is lighter and safer to handle.
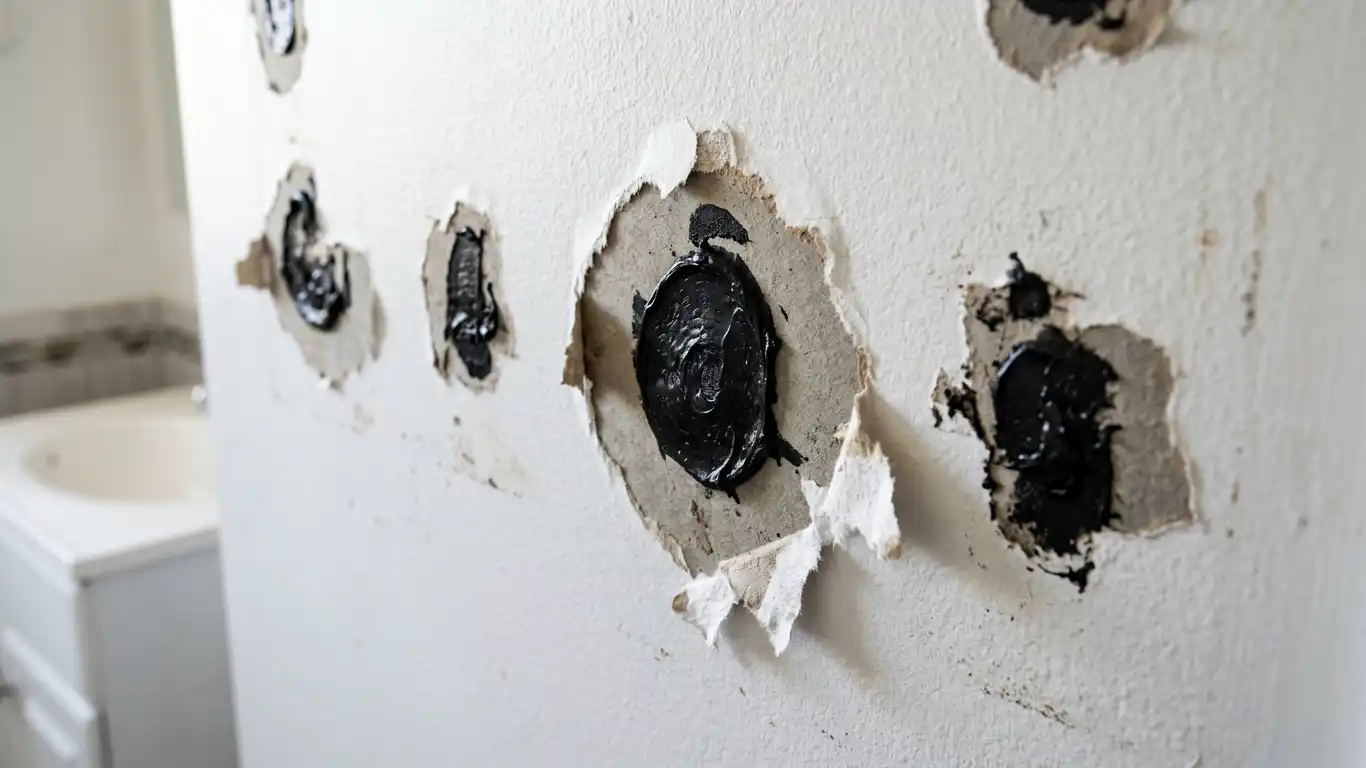
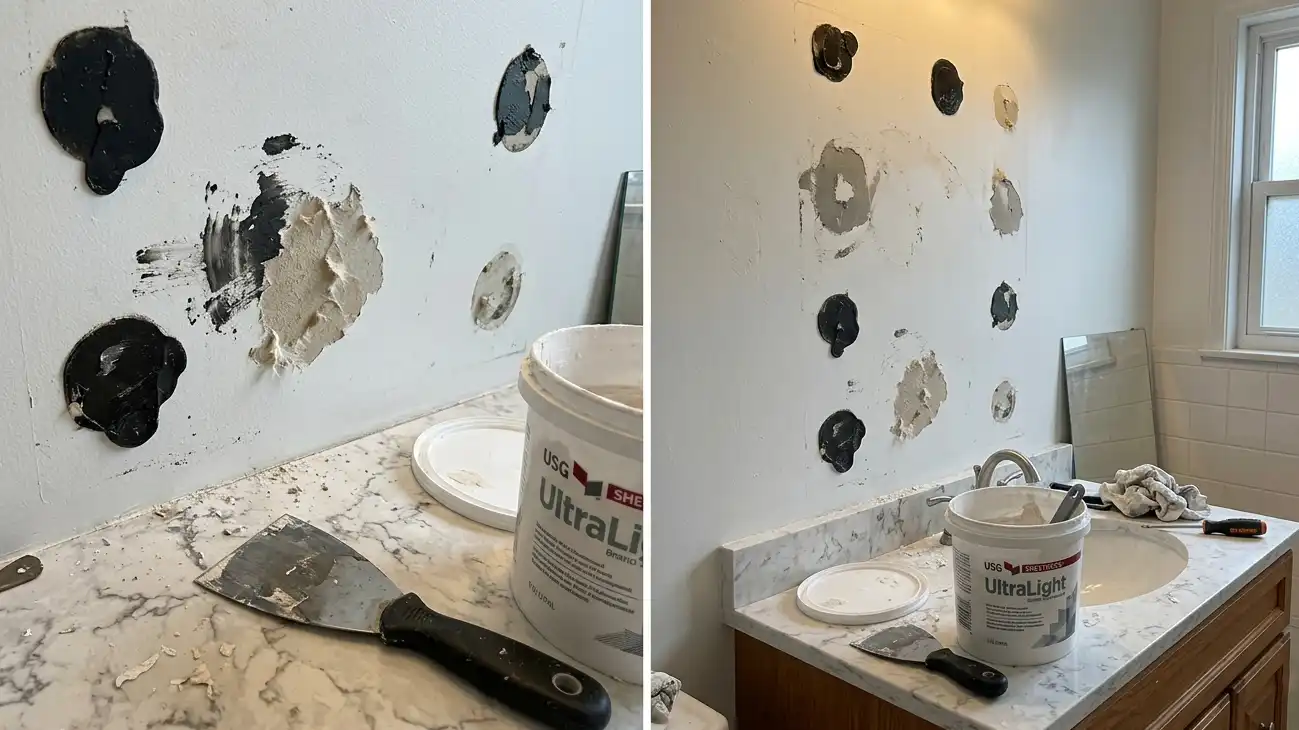
Adhesive Residue and Wall Repair
The mirror is off the wall. Now the real cleanup begins.
Step 1 — Remove the Adhesive Residue
Heat and scrape: Apply the heat gun to each remaining adhesive blob for 60–90 seconds, then scrape with the putty knife using long flat strokes. This removes the bulk of the material.
Chemical removal: For adhesive that won’t budge with heat alone, apply Goo Gone, WD-40, or mineral spirits to the blob and let it sit for 5 minutes. Then scrape. Wipe the wall clean with a damp cloth afterwards — residual solvent will prevent paint from sticking.
On tile: Use a plastic scraper instead of metal to avoid scratching the glaze. Rubbing alcohol on a cloth works well for silicone residue on tile without risking the surface.
Step 2 — Assess the Drywall Damage
| Damage Level | What You’ll See | Fix Required |
|---|---|---|
| Light | Torn paper facing, surface scuffs | Skim coat with joint compound |
| Moderate | Shallow gouges, small holes | Fill with fast-setting compound, sand |
| Heavy | Deep holes, large missing sections | Cut out and patch with new drywall |
Step 3 — Repair the Wall
For light to moderate damage, the process is straightforward:
- Scrape any raised bits flush with the wall
- Apply fast-setting joint compound (45-minute type) to holes and gouges
- Let it dry fully, then sand smooth with 120-grit sandpaper
- Apply a second coat if the first coat shrank as it dried
- Sand again with 150-grit when dry
- Prime the entire repaired area with drywall primer before painting — skipping primer will cause the patched spots to show through the paint
For larger repairs, cut the damaged drywall section out cleanly with a utility knife and replace it with a matching patch. Tape the seams with mesh tape before applying compound.
Getting Ready for a New Mirror
Once the wall is smooth and primed, you’re almost ready for the upgrade.
Check the surface is flat. Run a long straightedge across the repaired area. The new mirror needs to sit flush — any raised areas will cause the glass to contact unevenly and can lead to cracking over time.
Reconsider how you mount the next one. The fact that you just spent hours removing a glued mirror is reason enough to choose a different mounting method. Mirror clips, D-ring hangers, or a French cleat system make future removal a 10-minute job rather than a half-day project.
If you do want to use adhesive again, choose a purpose-made mirror adhesive rather than standard construction glue — it’s designed to hold the mirror firmly without attacking the reflective backing, and it’s generally easier to remove later.
Size and placement matter. Before buying a new mirror, take time to measure properly. Check out the bathroom mirror size guide for help matching mirror dimensions to your vanity width and wall space. For standard placement height, the bathroom mirror height guide covers the typical ranges that work for most adults.
If you’re upgrading to an LED mirror rather than a plain glass one, the LED mirror selection guide for bathroom upgrades is a good starting point for comparing features and styles. LuckMirror’s LED bathroom mirror collection and LED wall mirror range offer several options that mount with brackets rather than adhesive, which makes them considerably easier to remove if you ever need to.
For full installation instructions on hanging a new mirror, the guide on how to hang a mirror on a wall walks through anchoring, leveling, and securing different mirror types.
Summary
Removing a mirror glued to the wall is not complicated, but it does require the right approach for the specific adhesive and wall type you’re dealing with. Identify the glue first — mastic responds to heat, silicone needs cutting, and construction adhesive often needs chemical help. Prepare the area carefully, cover the mirror in tape, and choose your method before you start. For most standard bathroom mirrors, heat and a putty knife is the right call. For large mirrors or ones you want to keep, the wire saw gives you more control. Once the mirror is down, clear the residue, repair the drywall, and prime before painting. The whole job typically takes two to four hours for an average bathroom mirror — longer if the adhesive is old or heavy, and less if you have a partner helping with the lifting.
Frequently Asked Questions
How do you remove a mirror glued to the wall without damaging the drywall?
Use a heat gun to soften the adhesive first, then work a wide putty knife behind the mirror at a very low angle — almost flat against the wall. Brace the pry bar against the putty knife rather than the wall itself. Going slowly is the main factor; most drywall damage happens from rushing and using too much force.
Can you remove a glued bathroom mirror without breaking it?
Yes, particularly with the wire saw method. Thread wire or fishing line behind the mirror and use a back-and-forth sawing motion to cut through the adhesive. This method keeps both the mirror and the wall in much better condition than heat-and-pry. It works best on mastic and silicone adhesives and requires a second person to hold the mirror steady.
How do you remove old mirror mastic from drywall after the mirror is off?
Heat each blob with a heat gun for 60–90 seconds and scrape with a flat putty knife. For hardened or especially stubborn spots, apply Goo Gone or mineral spirits, let it sit for a few minutes, then scrape. Wipe the wall clean before patching, since any oily residue will prevent joint compound and paint from bonding properly.
What is the best way to remove a large heavy mirror glued to a bathroom wall?
Set up a safety support (step ladder on its side with padding, or a thick towel on the countertop) before you start. Use the shim method — tap wooden wedges gently behind the mirror at regular intervals and let the adhesive release gradually rather than forcing it. Always work with a second person and stand to the side, not directly in front, when the mirror releases.
How long does it take to remove a mirror glued to the wall?
A standard 60 × 90 cm bathroom mirror typically takes 1–2 hours for the removal itself. Add another 30–60 minutes for adhesive cleanup and basic wall repair. Large mirrors, very old adhesive, or mirrors on tile may take closer to 3–4 hours total. Planning for a full half-day means you won’t feel rushed, which is the main thing that leads to accidents.