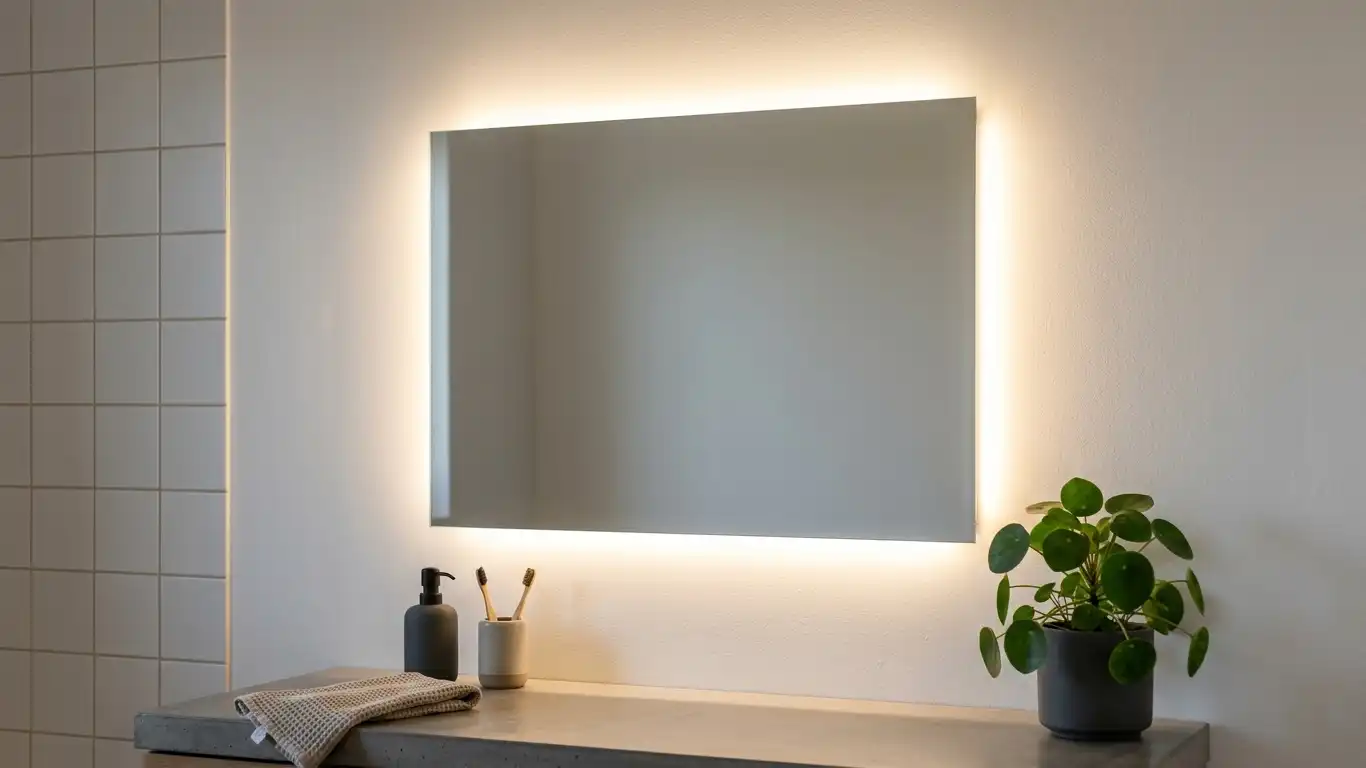
Most bathroom mirrors are underlit. The ceiling fixture fills the room but leaves your face in shadow — which is exactly the wrong setup for applying makeup, shaving, or checking your skin. Adding LED lights to the back of a mirror fixes that problem and, as a side effect, transforms an ordinary mirror into something that looks like it belongs in a luxury hotel. The halo of light that spills out from behind the glass softens the whole room. It is one of those small upgrades that punches well above its cost and effort. This guide walks you through the entire process — from deciding whether to DIY at all, to picking the right LED strip, to finishing the installation cleanly.
Why Add LED Lights to a Mirror?
Before spending an afternoon on a project, it helps to know what you actually get out of it.
Better task lighting. Overhead lights shine downward and create shadows under your chin, nose, and eyes — exactly where you need to see clearly. Light coming from behind a mirror bounces off the wall and wraps around your face from multiple angles, reducing those shadows significantly.
A cleaner, more intentional look. A backlit mirror reads as a design choice rather than a functional afterthought. The glow it produces makes a bathroom or bedroom feel more finished without requiring any major renovation.
Energy efficiency. LED strips run on very little power. A strip long enough to surround a standard bathroom mirror typically draws less than 20 watts — less than most incandescent nightlights.
Long lifespan. Quality LED strips last tens of thousands of hours under normal use. Once installed, you are unlikely to need to replace them for years.
For those who want the look without the project, there are purpose-built options worth considering. LuckMirror’s LED bathroom mirrors and LED wall mirrors come with integrated lighting already built in — useful context when deciding whether to DIY or buy.
DIY vs Buying a Pre-Made LED Mirror
This is the first decision to make, and it depends on your situation more than your skill level.
| Factor | DIY LED Strip | Pre-Made LED Mirror |
|---|---|---|
| Upfront cost | Low ($15–$50 for strips + power supply) | Higher ($80–$400+) |
| Installation time | 1–2 hours | 30–60 minutes |
| Customization | Full control over placement, color, brightness | Limited to what the product offers |
| Visual finish | Depends on wire management | Clean, factory finish |
| Best for | Mirror you already own, unusual sizes, tight budgets | New installations, clean aesthetic priorities |
| Risk | Visible wires if done carelessly | Virtually none |
The DIY route makes the most sense if you already own a mirror you like and simply want to upgrade it. It is also the better option for non-standard sizes or shapes. If you are starting from scratch with a new bathroom or vanity setup, a purpose-built LED vanity mirror often makes more practical sense — the finish is cleaner and no separate power management is needed.
Backlit vs Front-Lit
These two terms describe where the lights sit relative to the mirror, and they produce very different results.
Backlit (behind the mirror): The LED strip is mounted on the back of the mirror glass, pointing toward the wall. The light you see is indirect — it bounces off the wall and creates a halo effect around the mirror’s edges. This is primarily an ambient and aesthetic effect. It looks beautiful but provides only moderate task lighting on its own.
Front-lit (around the mirror face): The LED strip runs along the edges of the mirror’s front face, pointing outward toward the room — and toward you. This delivers direct face-level task lighting, which is better for precision grooming and makeup application.
Which should you choose?
- Want a floating glow effect for atmosphere → backlit
- Need strong, even lighting for makeup or shaving → front-lit
- Want both → mount strips on the back and use a separate overhead or side fixture for task light
This guide focuses on the backlit installation, since that is what most people mean when they search for how to add LED lights to the back of a mirror. For a broader look at mirror lighting options including front-mounted fixtures, the lights over mirrors in bathrooms guide covers each fixture type in detail.
How to Choose the Right LED Strip
Not all LED strips are the same. The wrong choice shows up in the finished result — uneven light, wrong color, strips that fall off within weeks. Here is what to look for.
Strip type
- SMD strips (e.g., SMD 2835 or SMD 5050): The standard option. Widely available, easy to cut and connect, good brightness. The 2835 chip is smaller and better suited to smooth, uniform backlighting.
- COB strips (Chip-on-Board): No visible individual dots — just a continuous line of light. Produces a cleaner, more diffused glow with less visible “hot spotting.” Worth the slightly higher price for a backlit mirror application.
LED density
Higher density means more even light and fewer visible hot spots.
| Density | Effect | Best Use |
|---|---|---|
| 30 LEDs/meter | Noticeable gaps between dots | Decorative only, not ideal for mirrors |
| 60 LEDs/meter | Reasonably uniform | Acceptable for most applications |
| 120 LEDs/meter | Smooth, even line | Recommended for backlighting |
| COB | No individual dots visible | Best for backlit mirrors |
Voltage
Most consumer LED strips run on 12V DC (suitable for most home installations) or 24V DC (slightly more efficient over longer runs). Either works for a standard mirror. Match your power supply to the strip’s voltage.
Strip length
Measure all four sides of your mirror and add 10% for overlap at corners. For a typical 60 × 80 cm bathroom mirror, you need roughly 3 meters of strip.
Color Temperature, CRI, and IP Rating: Three Specs That Actually Matter
These are the numbers that determine how good the light actually looks and how well it holds up in a bathroom environment.
Color Temperature (Kelvin)
Color temperature affects how your face looks in the mirror and how the space feels.
| Color Temperature | Light Quality | Best For |
|---|---|---|
| 2700–3000K | Warm white, slightly yellow | Bedroom vanities, cozy ambience |
| 3500–4000K | Neutral white, close to natural daylight | General bathroom use, balanced look |
| 5000–6500K | Cool white, slightly blue | High-precision makeup, clinical look |
For most bathroom backlighting, 3000–4000K is the practical sweet spot — warm enough to be flattering, neutral enough to show true colors.
CRI (Color Rendering Index)
CRI measures how accurately a light source shows colors compared to natural daylight, on a scale of 0 to 100. This matters most when you are using the mirror for makeup or skincare.
- CRI below 80: Colors look dull or slightly off. Foundation shades can appear different under this light than they do in daylight.
- CRI 80–89: Acceptable for general use.
- CRI 90+: Colors look accurate and natural. This is the threshold worth targeting for any mirror used for grooming or makeup. For the best lighted makeup mirror results, high CRI is non-negotiable.
IP Rating (Ingress Protection)
The IP rating indicates how well the strip is protected against moisture and dust. In a bathroom, this is not optional.
| IP Rating | Protection Level | Bathroom Suitability |
|---|---|---|
| IP20 | No moisture protection | Dry rooms only |
| IP44 | Splash-resistant | Suitable for most bathrooms |
| IP65 | Dust-tight, protected against water jets | Recommended for bathroom use |
| IP67 | Can withstand brief submersion | Wet rooms, steam showers |
For a standard bathroom mirror, IP65 provides adequate protection without overpaying. If the mirror is close to a shower or in a steam-heavy environment, IP67 is worth the upgrade.
Lighting Control Options: Dimmer, Remote, or Smart?
How you control the lights makes a real difference to daily usability.
Basic on/off switch: The simplest option. Plug the power adapter into a switched outlet, and the lights come on when you flip the wall switch. No separate control required. Works well if you only need the lights at one brightness level.
Inline dimmer or touch dimmer: A small controller wired between the power supply and the strip. Lets you dial the brightness up or down. Costs a few dollars more and adds meaningful flexibility.
RF remote controller: Common in LED strip kits. Usually lets you adjust brightness, switch between color temperatures (on tunable white strips), and turn the lights on or off from across the room. Good for bedroom vanity mirrors where you might want to set a mood.
Wi-Fi or Bluetooth smart controller: Connects to an app on your phone. You can schedule the lights, set scenes, and integrate with voice assistants like Amazon Alexa or Google Home. Overkill for a basic bathroom mirror; genuinely useful for a bedroom setup where you want the mirror lighting to coordinate with the rest of the room.
Recommendation: For most bathroom installations, a touch dimmer or RF remote gives you everything you actually need without unnecessary complexity. Smart control is worth considering if you are already running a smart home system.
No Outlet Nearby? Battery, USB, and Wireless Options
Some mirrors — particularly in older homes, rental apartments, or rooms without convenient outlet placement — are not close to a power source. Running a power cable across the wall is an option, but it requires either hiding the cable with a raceway or hiring an electrician. Here are the alternatives.
Battery-powered LED strips:
- Self-contained, no wiring needed
- AAA or AA battery boxes typically power a 1–2 meter strip for several hours of use per charge
- Practical for occasional use; less practical if the mirror is used daily, since batteries need replacing regularly
- Best for entry mirrors, closet mirrors, or any location where the lights are only on briefly
USB-powered LED strips:
- Connect to any USB power adapter or USB port
- A standard 5V/2A USB adapter (the kind that comes with most phones) can run a 1–2 meter strip at full brightness
- Easy to plug into a USB port on a nearby power bank, smart speaker, or outlet adapter
- Good balance of convenience and cost
Rechargeable power bank:
- A small power bank hidden behind the mirror can power USB LED strips for days between charges
- Works well in rental apartments where drilling or running new cable is not an option
When to just run the cable: If the mirror will be used daily and you have any access to an outlet within 2–3 meters, a standard plug-in power adapter is more reliable and far cheaper to run long-term. A cable raceway or adhesive wire channel can conceal the cord neatly along the wall.
Step-by-Step: How to Add LED Lights to the Back of a Mirror
What you need
- LED strip lights (with adhesive backing)
- Matching power supply / adapter (12V or 24V, depending on your strip)
- Scissors
- Isopropyl alcohol + clean cloth
- Measuring tape
- L-shaped corner connectors (optional, for cleaner corners)
- Cable clips or adhesive wire channels
- Spacers or standoffs (to hold the mirror off the wall, if not already offset)
Step 1: Clean the back of the mirror
Wipe down the entire back surface with isopropyl alcohol and a clean cloth. Pay close attention to the perimeter where the strip will sit. Any grease, dust, or residue will weaken the adhesive and cause the strip to peel off over time. Let the surface dry completely before moving on.
Step 2: Measure and plan the layout
Measure the perimeter of the mirror and calculate how much strip you need. Add a small buffer — it is better to cut than to run short.
Decide how far from the edge to place the strip. 3–5 cm inward from the edge is the typical recommendation. Placing it too close to the edge creates a harsh, visible line; further in produces a softer, more diffused halo once the mirror is mounted.
Mark the strip path lightly with a pencil or dry-erase marker as a guide.
For a round or oval mirror: Measure the diameter and multiply by 3.14. Use a flexible COB strip and bend it gradually — do not force sharp angles.
Step 3: Cut the strip to length
LED strips have designated cut marks — usually small printed scissor icons or copper contact pads, spaced every 3–5 cm. Cut only at these marks. Cutting anywhere else breaks the circuit and leaves that segment dark.
If your mirror has corners and you prefer a continuous strip rather than corner connectors, make four separate cuts and join the sections with L-shaped snap connectors.
Step 4: Handle the corners
You have two options at each corner:
Fold method: Bend the flexible strip at 45 degrees, fold it back on itself, then continue around the corner. This works but can stress the strip over time.
Connector method: Cut the strip at each corner, attach an L-shaped corner connector to each cut end, and snap the sections together. This is cleaner, puts less mechanical stress on the strip, and makes future adjustments easier. Worth the extra few minutes.
Step 5: Attach the strip to the mirror
Starting from the point where the power cable will exit (ideally at the bottom where it will be least visible), peel back a few centimeters of the adhesive backing and press the strip onto the mirror surface, following your guide marks.
Work in small sections — peel a few centimeters, press firmly, repeat. Do not peel the entire backing at once. The adhesive sets quickly, and repositioning becomes difficult once contact is made.
Press along the full length of the strip with firm, even pressure. The bond improves over the first few minutes as the adhesive settles.
Step 6: Connect the power and test
Connect the free end of the strip to your power supply using the included connector or by wiring directly. Double-check that positive (+) connects to positive and negative (−) to negative. Polarity matters — a reversed connection will either prevent the strip from lighting or, in some cases, damage the controller.
Plug in the power supply and turn it on. Check that every section of the strip lights up evenly. If a section is dark, it is usually a loose connector rather than a damaged strip — reseat the connector first before assuming the worst.
Do this test before mounting the mirror. Diagnosing a dead section is much easier when everything is still accessible.
Step 7: Mount the mirror with the right gap
For the backlit effect to work, the mirror needs space between its back and the wall — the light needs room to spread before it hits the wall surface. A gap of 3–5 cm produces the best halo effect. Less than that and the glow looks harsh and narrow; more than that and it can look washed out.
If your mirror already hangs on a bracket that holds it slightly away from the wall, you may have enough gap. If the mirror sits flush against the wall, use adhesive mirror spacers or standoff hardware to create the offset.
Check that the mirror hangs level, then secure it in place.
Step 8: Manage the wiring
This step is the difference between an installation that looks professional and one that looks improvised.
- Route the power cable along the bottom or side of the mirror to the outlet, keeping it as close to the wall as possible
- Use adhesive cable clips or a slim adhesive wire channel to hold the cable flat against the wall
- If the outlet is directly behind the mirror and the cable is short, tuck the adapter behind the mirror where it will not be visible
- In bathrooms, use a cable raceway rated for damp locations if the cable runs along a wall that sees steam or splashes
The goal is a single, clean line from mirror to outlet — not a loop of slack cable hanging on the wall.
A Note on Bathroom Safety
Working with low-voltage LED strips (12V or 24V DC) is generally safe for DIY installation. The voltage is too low to cause a serious shock. However, a few points are worth keeping in mind:
- Waterproofing matters. Use IP65-rated strips in any bathroom. Steam and humidity will damage unprotected strips over time and can create intermittent faults.
- Keep connections away from direct water contact. Connectors and the power adapter are typically not waterproofed even if the strip itself is. Position them well away from the shower or sink.
- If hardwiring is involved — connecting to your home’s mains wiring rather than using a plug-in adapter — hire a licensed electrician. This guide covers plug-in installations only.
Conclusion
Adding LED lights to the back of a mirror is one of the more rewarding small home projects — the result looks intentional and polished, and the process is straightforward once you understand the key decisions. Choose a strip with the right color temperature and a CRI of 90 or higher, confirm the IP rating matches your environment, leave a 3–5 cm gap between mirror and wall for the light to diffuse properly, and take your time with wire management. Those four things, more than anything else, determine whether the finished result looks like a DIY job or something installed by a professional. If you would rather skip the project entirely, purpose-built LED bathroom mirrors, round LED mirrors, and LED makeup mirrors deliver the same effect without the setup.
FAQ
Can you add LED strip lights to a mirror without drilling or damaging the wall?
Yes. The LED strip itself adheres directly to the back of the mirror glass using the strip’s built-in adhesive backing — no drilling required. For mounting the mirror with the necessary gap from the wall, adhesive standoffs or foam spacers can hold it in position without permanent fixings. In rental apartments where wall damage is a concern, these no-drill options work well for lighter mirrors.
What color temperature LED is best for a bathroom mirror?
For most bathrooms, a color temperature between 3000K and 4000K works well. Warmer tones (2700–3000K) are more flattering but can slightly distort color accuracy. Cooler tones (4000K+) render colors more accurately, which matters for makeup application. If you are primarily using the mirror for grooming or applying makeup, aim for 4000K with a CRI of 90 or above.
How do you hide the LED strip wires behind a mirror?
The cleanest approach is to route the power cable along one edge of the mirror and down the wall inside an adhesive cable raceway or wire channel. These come in paintable plastic and, when painted to match the wall, become nearly invisible. If the power adapter sits directly behind the mirror and the cable is short, you may be able to tuck it completely out of sight behind the mirror itself.
Can LED strip lights be used on a round or oval mirror?
Yes. For curved mirrors, use a flexible COB LED strip rather than a standard SMD strip — COB strips bend more smoothly without visible gaps between light points. Measure the circumference (diameter × 3.14 for a circle), add 10% for overlap, and apply the strip gradually, pressing section by section rather than trying to lay the whole strip at once.
How far from the edge should LED strips be placed on the back of a mirror?
The standard recommendation is 3–5 cm inward from the mirror’s edge. This distance determines how the light diffuses onto the wall behind the mirror. Too close to the edge and the glow looks like a sharp line; further in and the halo softens and spreads more evenly. The gap between the mirror and the wall (ideally 3–5 cm) has an equal effect — both distances work together to produce the diffused glow that makes backlit mirrors look distinctive.