A single large mirror can change how a room feels — more light, more depth, a sense of space that wasn’t there before. A wall to wall mirror takes that effect several steps further. Done right, it looks like the wall itself opened up. Done wrong, you’re left with a cracked panel, a patchy wall, or worse, a 60-pound sheet of glass sliding off its mounts six months later. This guide walks you through everything: picking the right mirror type, measuring your space, reading your wall, budgeting the job, choosing a mounting method, gathering tools, doing the installation step by step, and — if you want to push the design further — integrating backlit LED lighting. Whether you’re outfitting a home gym, a bathroom, or a living room, the process is the same. Get the order right, and you won’t have to do it twice.
Types of Mirrors
Before you buy anything, it helps to know what the market actually offers for wall-to-wall applications. Not every mirror type suits every space or every installation method.
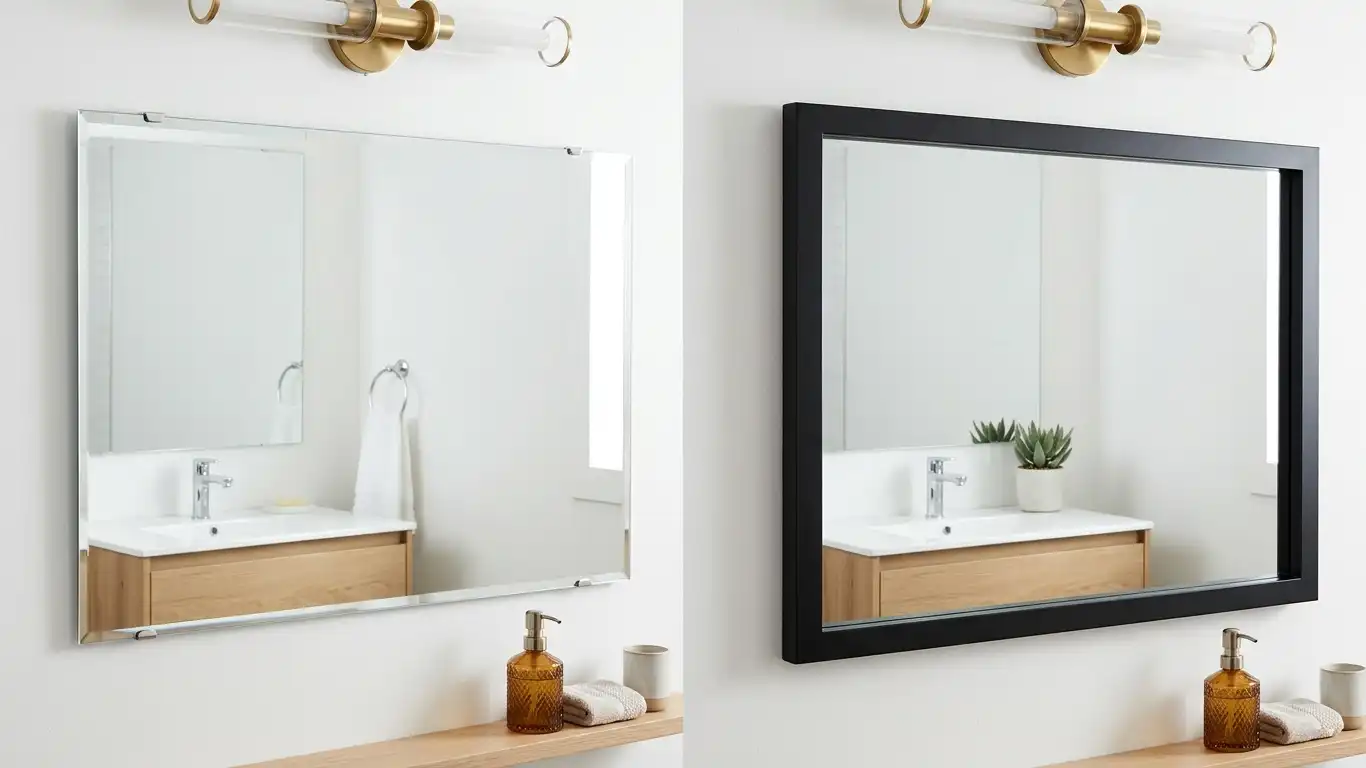
Frameless Mirrors
These are the most common choice for large-scale wall coverage. With no frame to interrupt the reflection, they create a seamless surface that reads as part of the wall. The edges are typically polished flat or cut with a slight bevel. They’re usually fixed with adhesive, J-channel clips, or a combination of both.
One thing worth knowing: frameless mirrors are heavier per square inch than you might expect. A single 48″ × 72″ panel of ¼” glass can weigh close to 60 lbs. Plan your wall and hardware accordingly.
Framed Mirrors
Framed mirrors — wood, metal, or composite frames — are a better fit for living rooms, bedrooms, and hallways where the aesthetic matters as much as the coverage. They almost always come with built-in hanging hardware (D-rings, keyhole slots, or a hang rail), which makes installation more forgiving. If you want a wall-to-wall effect with framed mirrors, you’re typically arranging several panels side by side rather than mounting one continuous piece.
For a full overview of framed options and the style differences between them, see Bathroom Mirrors Framed: The Complete Guide to Styles, Materials & Sizes.
Mirror Tile Panels
Mirror tiles — typically sold in 12″ × 12″ or similar square formats — give you a modular approach to covering a large wall. Each tile is light and easy to handle, which makes them genuinely DIY-friendly. The trade-off is that the seams between tiles are visible and the overall reflection tends to be slightly fragmented, especially if the tiles aren’t perfectly aligned. They’re best used in lower-traffic decorative applications rather than gym or dance studio walls where a clear, distortion-free view matters.
Tempered and Shatterproof Mirrors
For home gyms, dance studios, and any space where the mirror might take an impact, tempered glass or shatterproof film-backed mirrors are worth the extra cost. Tempered glass, when it does break, shatters into small blunt fragments rather than long sharp shards. Some products use a safety backing film that holds broken pieces together even if the glass cracks.
If weight is a concern — especially for rental properties or drywall that can’t be reinforced — acrylic mirror panels are a lightweight alternative. They won’t shatter, they’re significantly lighter than glass, and they can be cut to size with standard woodworking tools. The downside is that acrylic scratches more easily and the reflection isn’t quite as sharp as glass.
| Mirror Type | Best For | Key Consideration |
|---|---|---|
| Frameless glass | Gym, bathroom, minimalist spaces | Heavy — needs solid wall anchors |
| Framed mirror | Bedroom, living room, hallway | Easier to hang, more visual weight |
| Mirror tiles | Decorative accent walls | Visible seams, easier handling |
| Tempered / shatterproof | High-activity or family spaces | More expensive, safer on impact |
| Acrylic mirror | Rentals, lightweight installs | Scratches more easily |
Measuring the Space
Measurement errors are the leading cause of wasted material and misaligned mirrors. Spend twenty minutes here and you’ll save yourself hours of frustration later.
The Five Numbers You Need Before You Order
- Wall width — measure corner to corner at the height where the mirror will sit. Walls are rarely perfectly square, so measure at both top and bottom if the span is large.
- Floor-to-ceiling height — at multiple points across the wall, since ceilings aren’t always level.
- Outlet and switch positions — mark their center points. You’ll either need to cut around them in the mirror or route around them with your panel layout.
- Baseboard height — mirrors typically start above the baseboard. Measure from the top of the baseboard to where you want the mirror bottom to sit.
- Any obstructions — pipes, vents, recessed light fixtures along the wall face.
Mirror Height: Where Should It Start and Stop?
For most residential spaces, starting the mirror about 400–500 mm (16–20 inches) off the floor and running it to within 100–150 mm of the ceiling is a practical range. This keeps the bottom edge away from furniture contact and leaves a gap at the top that’s less noticeable than a floating gap in the middle.
For home gyms specifically, the goal is full-body visibility during exercise. That typically means bringing the mirror as low as possible — 50–100 mm above the baseboard — and as high as practical. If there are electrical outlets on the wall (code places most outlets at around 12–18 inches from the floor), you’ll need to work around them.
For guidance on setting height in bathroom applications, Bathroom Mirror Height: The Complete Guide to Perfect Placement covers the topic in depth.
Planning Multi-Panel Layouts
If your wall is wider than 48 inches — which most walls are — you’ll need more than one mirror panel. Here’s a quick way to work out the layout:
- Take your total wall width in inches.
- Divide by your panel width (36″ or 48″ are the most common standard sizes).
- The leftover inches become your border spacing — split equally between the two sides.
Example: A 120-inch wall with 48-inch panels: 120 ÷ 48 = 2.5 panels. So two full panels plus 24 inches of remaining space. Split that as 12-inch borders on each side. The result is a balanced layout with two mirrors and a clean margin on both edges.
Using more, narrower panels (36″) gives you less gap per side but more seams to manage. Fewer, wider panels mean fewer seams but larger border margins. Neither is wrong — it comes down to the look you prefer.
For detailed sizing guidance across different room types, the Bathroom Mirror Size Guide is a useful reference even for non-bathroom spaces.
Wall Types
The type of wall you’re mounting onto determines what hardware you can use, what weight the wall can hold, and how you’ll drill (or whether you’ll drill at all). Getting this wrong is how mirrors end up on the floor.
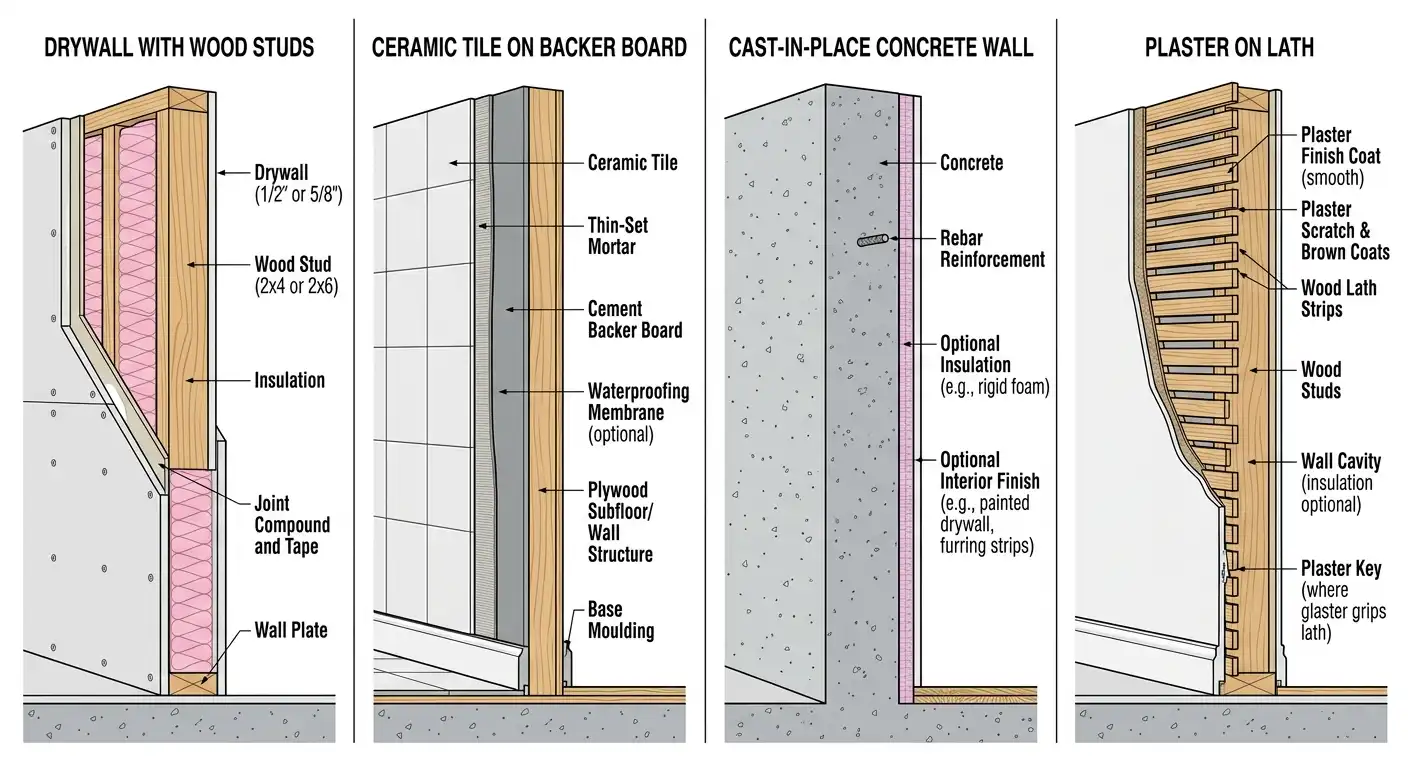
Drywall (Gypsum Board)
This is the most common interior wall material in North American homes. Drywall itself has limited holding strength — a screw driven into drywall alone can hold a small mirror, but anything over 15–20 lbs needs to hit a stud or use a rated hollow-wall anchor.
Studs sit behind the drywall at roughly 16-inch intervals (sometimes 24 inches in older construction). A stud finder will locate them. When possible, anchor your mounting hardware directly into studs — it’s simply the most reliable approach.
When studs aren’t where you need them, use toggle bolts or molly bolts rated for the mirror’s weight. Check the box — anchor ratings vary widely, and using underpowered hardware is the most common DIY mistake.
Tile Walls
Tile adds an extra layer of complexity because drilling through ceramic or porcelain without the right bit will crack it. Use a diamond-tipped drill bit, run the drill at low speed, and keep the bit cool with water or a damp sponge. Tape over the drill point before you start to prevent the bit from wandering.
For tile walls, adhesive mounting is often a better choice than drilling, as long as the tile surface is clean, dry, and fully bonded to the substrate behind it.
Concrete and Brick
Solid masonry walls are the strongest substrate you can mount to, but they require a hammer drill and masonry anchors (like Tapcon concrete screws). Standard drill bits will not work. The upside is that once you’re in, the holding capacity is far higher than drywall — even a heavy multi-panel installation will be stable.
Plaster Walls
Common in homes built before the 1950s, plaster is harder and more brittle than drywall. It drills differently — it tends to crack around the hole rather than compress neatly. Toggle bolts work well here. Drill slowly and use a sharp bit to minimize cracking.
Quick wall check: If you tap the wall with a knuckle and it sounds hollow in some places and solid in others, you’re on drywall over studs. If it sounds solid everywhere, it’s likely plaster or concrete. A strong magnet can also help — it will stick slightly to drywall screws holding the board to studs.
Installation Cost
Cost questions come up early in the planning process, and the answers vary a lot depending on scale and approach. Here’s a grounded breakdown without padding.
Material Costs
The mirror itself is the biggest variable. Plain mirror glass for wall coverage typically runs $5–$20 per square foot depending on thickness and edge treatment. A standard 6-foot-wide by 8-foot-tall frameless mirror — a common size for a gym wall — usually falls in the $250–$400 range before shipping. Specialty glass (tempered, low-iron, bronze tint) costs more.
Mounting hardware adds $15–$60 depending on the method: J-channel and clips are at the lower end; a proper French cleat system with quality hardware runs higher.
Mirror adhesive (mastic) is sold in tubes for about $10–$20 each. A full wall installation typically uses 2–4 tubes depending on panel size.
Labor Costs
If you hire a professional glazier or handyperson, expect to pay $50–$150 per hour. A full-wall install for a single bathroom mirror might take 1–2 hours. A multi-panel gym wall with several 48″ × 72″ panels could take 4–6 hours or more.
| Item | Estimated Cost |
|---|---|
| Mirror glass (per sq ft) | $5–$20 |
| Standard 6’×8′ wall mirror (material only) | $250–$400 |
| Full gym wall mirror kit (material only) | $800–$2,500 |
| Mounting hardware | $15–$60 |
| Mirror adhesive / mastic | $10–$20 per tube |
| Professional labor (per hour) | $50–$150 |
| DIY hardware and consumables total | $20–$75 |
| Old mirror removal | $25–$100 |
DIY vs. Professional: Where the Line Is
Small decorative mirrors and single bathroom mirrors are well within DIY range. Multi-panel wall coverage with frameless glass panels over 30 lbs each starts to carry real risk if you’re not comfortable with the process. Glass that falls during installation doesn’t just break — it breaks in ways that can injure you and damage the wall seriously.
For anything over two large panels, or any installation on tile or concrete, getting a professional quote is worth the time. You might still DIY it after comparing, but you’ll know what a proper install is priced at.
Mounting Methods
This is the decision with the most technical weight. Each method has a different risk profile, aesthetic result, and degree of permanence. Most installers use a combination.
Method 1: Mirror Adhesive (Mastic)
Mirror mastic is a specialized adhesive designed specifically for bonding glass mirror to walls. It forms a permanent bond and leaves no visible hardware on the face of the installed mirror — which is why it’s the preferred method for frameless, high-end installations.
What to buy: Look for a neutral-cure silicone or solvent-free mastic labeled specifically for mirrors. Avoid construction adhesives that contain acetone, toluene, or acetic acid — these chemicals corrode the silver backing and will cause black spots or edge deterioration over time.
How to apply it: Apply in small vertical dots — roughly 10–15 mm in diameter — spaced about 200 mm apart, running in vertical columns down the back of the mirror. Don’t draw horizontal beads or criss-cross patterns. Vertical columns leave air channels that allow gases to escape as the adhesive cures. Keep adhesive at least 50 mm away from the mirror’s edges to prevent bleed-out.
The catch: Once bonded, this is essentially permanent. Removing a mastic-mounted mirror without cracking it or tearing up the wall is difficult. If there’s any chance you’ll want to move it, choose a different method. For guidance on the removal process, see How Do You Remove a Mirror Glued to the Wall?
Method 2: J-Channel and Mirror Clips
A J-channel is a metal or plastic rail with a slot that the mirror’s bottom edge sits in. The mirror is then held against the wall at the top and sides by spring-loaded or screw-type clips. This system is removable, reusable, and leaves no permanent mark on the wall.
The key installation rule: the J-channel carries all the weight, so it must be anchored into wall studs — not just drywall. If your studs aren’t in the right position, blocking (a horizontal piece of wood screwed between studs behind the drywall) can provide a solid anchor point.
For J-channels used in bathrooms or near water, check that the bottom rail has drainage slots or holes. A J-channel that traps water will accelerate the black-edge deterioration that ruins mirror backing over time.
Method 3: French Cleat
A French cleat uses two strips of wood (typically ¾” plywood) each cut at a 45° angle along one long edge. One strip mounts to the wall (angled edge facing up and out), the other attaches to the back of the mirror (angled edge facing down and in). The two pieces interlock when the mirror is lifted onto the wall.
This method distributes weight evenly across the full width of the cleat rather than concentrating it at two or three screw points. It’s the most reliable approach for mirrors over 50 lbs and for any installation where you want the option to remove and reposition later.
French cleats require that the mirror back be thick enough to attach the cleat strip to — frameless glass panels won’t work here without a backing board. They’re best suited for framed mirrors or mirror panels with a solid frame structure.
Combination Approach (Most Reliable for Large Frameless Mirrors)
Many professional installers use mastic for the main bond and add a J-channel at the bottom as a physical support. The J-channel holds the mirror in position while the adhesive cures and gives a mechanical backup in case the adhesive ever weakens. If you’re covering an entire gym wall with multiple large panels, this combination approach is worth the extra hardware cost.
| Method | Permanent? | Load Capacity | Best For | Avoid When |
|---|---|---|---|---|
| Mirror mastic | Yes | High (if applied correctly) | Frameless large mirrors | Rental properties, tile walls |
| J-channel + clips | No | Medium–High (if anchored to studs) | Removable installations | Stud spacing doesn’t line up |
| French cleat | No | Very high | Heavy framed mirrors 50 lbs+ | Thin frameless glass panels |
| Mastic + J-channel | Mostly yes | Highest | Full-wall multi-panel installs | Beginners without experience |
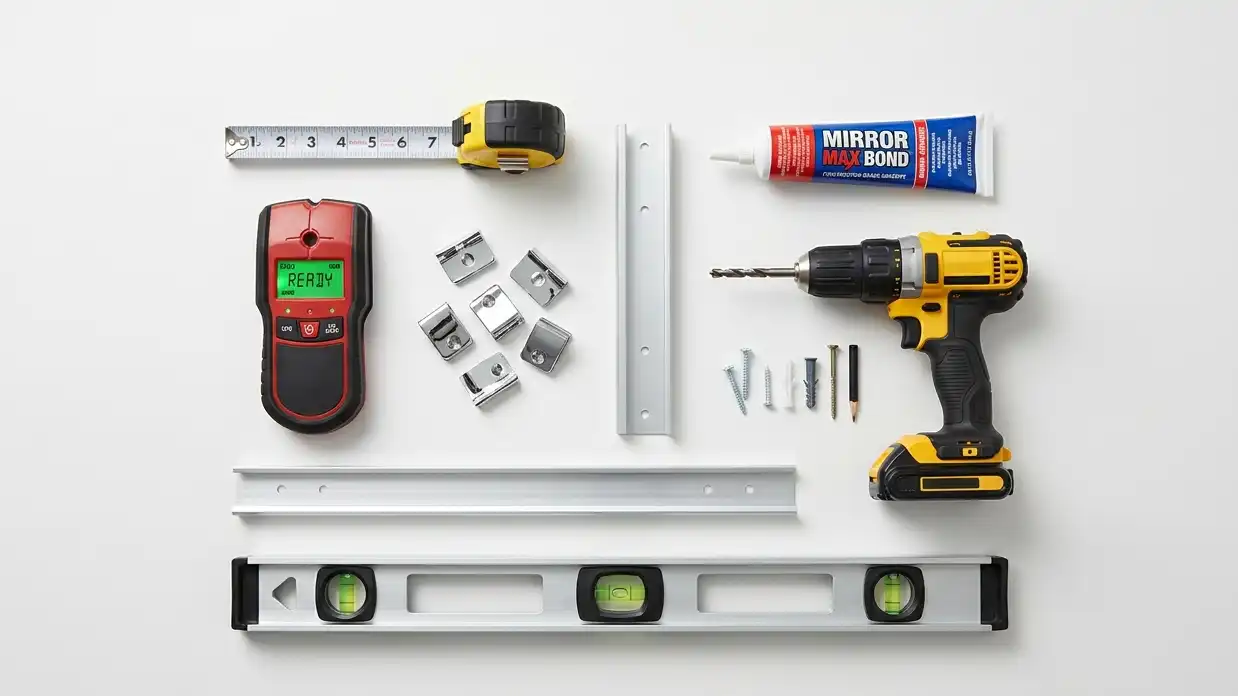
Tools and Materials
There’s nothing more frustrating than stopping an installation mid-way because you’re missing a drill bit. Here’s a complete list organized by function.
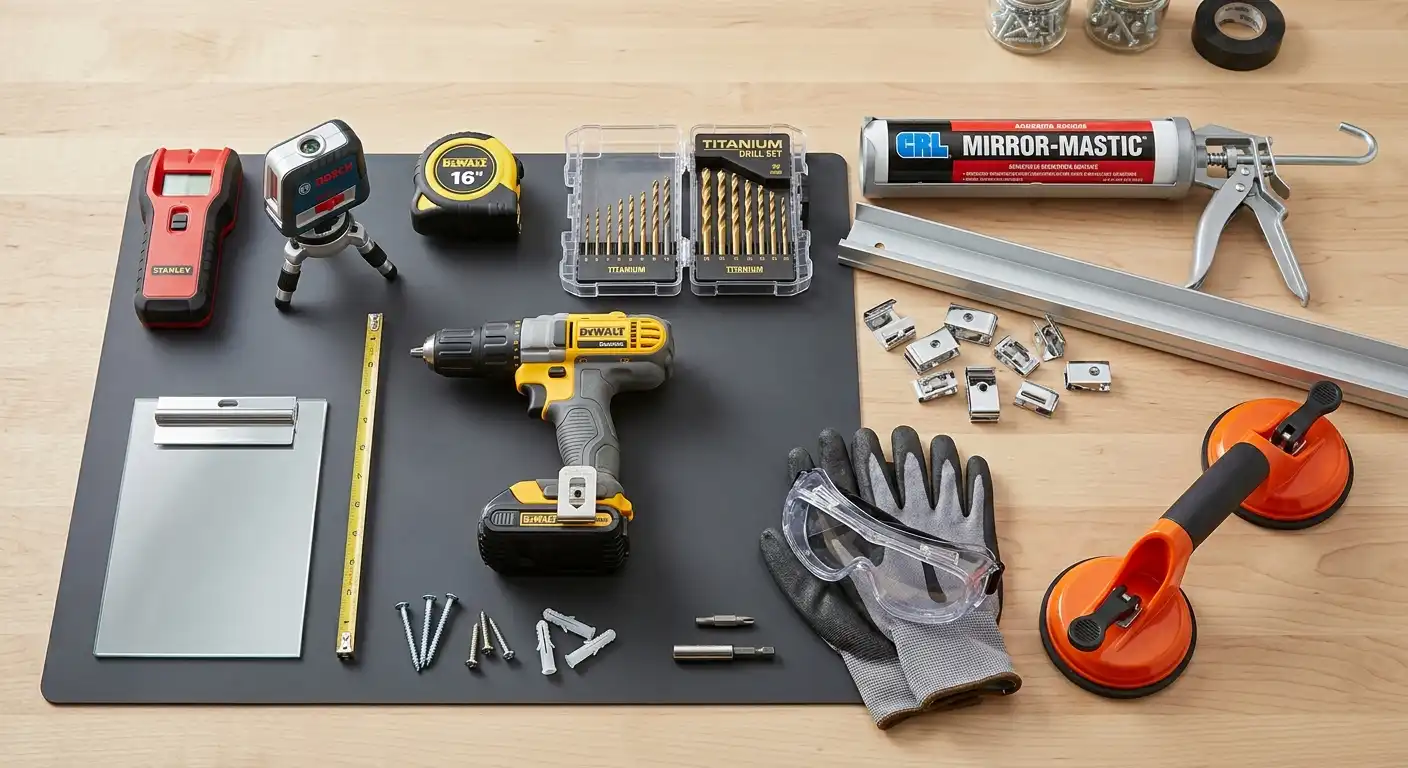
Measuring and Layout
- Tape measure (at least 25 ft)
- Laser level or spirit level
- Pencil and chalk line
- Stud finder — get one with live wire detection if your walls have electrical behind them
Drilling and Fastening
- Cordless drill, 18V or higher
- Drill bits: standard bits for drywall/wood, diamond-tipped for tile, masonry bits for concrete
- Screwdriver (for clips and J-channel hardware)
Mounting Hardware (select based on your chosen method)
- J-channel rail and matching mirror clips
- Mirror mastic (neutral-cure, solvent-free)
- Neoprene or rubber setting pads (placed inside J-channels to cushion the mirror edge)
- French cleat strips (¾” hardwood plywood) — only if using this method
Safety and Handling
- Cut-resistant gloves — non-negotiable when handling large glass panels
- Safety goggles
- Glass suction cup handles — make a huge difference when lifting and positioning large mirrors
- Drop cloth or cardboard to protect the floor
Finishing Supplies
- Painter’s tape (for marking positions and temporary support during cure)
- Neutral silicone caulk (for sealing the mirror bottom edge in wet areas)
- Ammonia-free glass cleaner and lint-free cloths for the final clean-up
Step-by-Step Installation Guide
With the right prep behind you, the actual installation is methodical rather than difficult. Work slowly — speed is where mistakes happen with glass.
Before you start: For mirrors over 60 lbs, two people are required. Do not attempt to lift, position, or hold a large mirror alone.
For a broader overview of the general mirror hanging process, How to Hang a Mirror on a Wall: A Complete Guide covers the fundamentals in detail.
Step 1 — Prepare the Wall
Strip the wall of everything: outlet covers, hooks, picture nails, baseboard trim near the work area. If there’s wallpaper, remove it — adhesives don’t bond well to paper surfaces, and clip hardware will pull away over time.
Check the wall surface for bumps, ridges, and dips. Hold a long level or straight board flat against the surface and look for gaps. A gap larger than about 5 mm will need to be filled and sanded flat. On drywall, this is a quick joint compound job. On plaster, it takes a bit more work but is worth doing.
Prime bare drywall with a sealing primer and let it fully dry before you mount anything. Damp primer trapped behind a mirror will damage the silver backing within months.
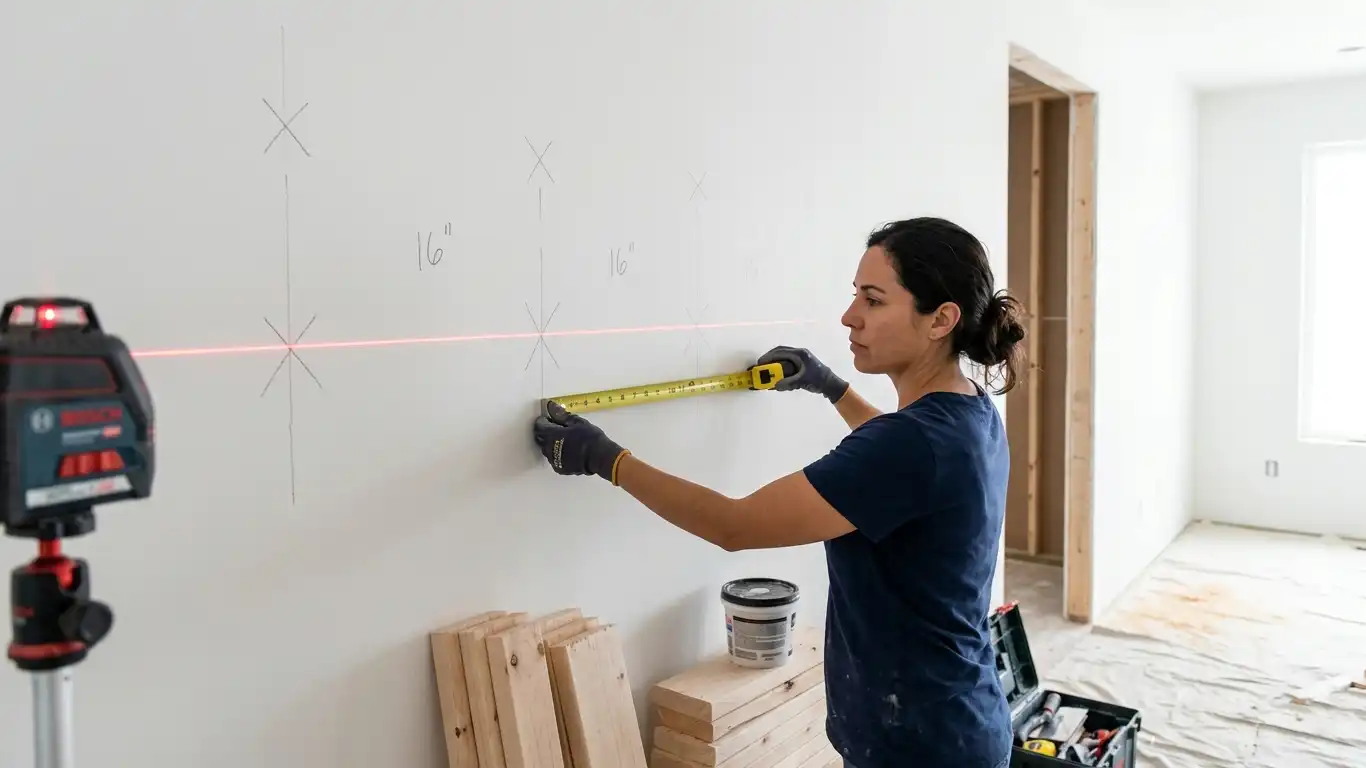
Step 2 — Mark the Wall
Use your stud finder and mark every stud with a light pencil line, running floor to ceiling. These will guide your hardware placement.
Snap or draw a perfectly level horizontal line at the mirror’s bottom edge height. Use a laser level if you have one — chalk lines can bow slightly over long runs.
Use painter’s tape to outline the full footprint of each mirror panel on the wall. This gives you a clear visual of the final layout before anything is committed.
Step 3 — Install the Bottom J-Channel (If Using)
With your level line as a guide, screw the J-channel along the bottom edge of the mirror area. Drive screws into studs wherever possible. Where studs aren’t available, use toggle bolts rated for at least twice your mirror’s expected weight.
Place 3 mm neoprene setting pads inside the channel at regular intervals — roughly every 12 inches. These protect the mirror’s bottom edge from direct metal contact and allow micro-adjustments.
Check the channel with a level one more time before moving on. A slightly off-level J-channel means a slightly tilted mirror, and the eye catches that faster than you’d expect.
Step 4 — Apply the Adhesive (Mastic Method)
Lay the mirror face-down on a padded surface. Clean the back thoroughly with an ammonia-free cleaner and let it dry completely.
Load your mastic into a caulking gun. Apply it in vertical dot columns across the back of the mirror, keeping 50 mm clear of all four edges. Dots should be roughly 10–15 mm across. Don’t glob on more than you need — oversized beads trap air and dry unevenly.
Step 5 — Lift and Set the Mirror
Using suction cup handles and a second person, lift the panel and carefully lower its bottom edge into the J-channel. Then slowly tilt the top of the mirror toward the wall.
Once the adhesive contacts the wall surface, press gently but firmly — start at the center and work outward. Don’t reposition the mirror once the mastic has made contact with the wall; peeling it off to adjust will disrupt the adhesive pattern.
Check level immediately. Use a spirit level against the face of the mirror. If it’s slightly off, you have a short window — about 3–5 minutes depending on the product — to make adjustments before the adhesive sets.
Install the upper clips to hold the mirror in place during cure.
Step 6 — Temporary Support During Cure
Do not remove the clips or tape for at least 24 hours. In humid rooms, 48 hours is safer. Keep the room at a stable temperature (15–30°C) and avoid running shower steam or other high-humidity activity in the space while the adhesive cures.
Support the top of the mirror with folded painter’s tape or wooden wedges at the sides. The goal is to prevent any sliding movement before the mastic has fully set.
Step 7 — Finishing Touches
Remove all tape and temporary supports. In bathrooms or any space with water exposure, run a thin bead of neutral silicone caulk along the seam where the mirror bottom meets the J-channel or wall surface. Tool it flat with a damp finger. This prevents water from wicking behind the glass and reaching the mirror backing.
Reattach outlet covers and any trim you removed. Clean the mirror face with an ammonia-free glass cleaner and a lint-free cloth — work top to bottom in parallel strokes to avoid streaking.
Multi-Panel Installations: Two Extra Rules
For walls covered by several panels side by side, install from the center outward. Start with the middle panel, then work left and right. This keeps the layout visually centered even if your measurements were slightly off at the edges.
Leave a 1–3 mm gap between adjacent mirror panels. Use small polycarbonate setting blocks cut to your target thickness to hold that gap consistent during installation. Mirror glass expands and contracts slightly with temperature; panels touching each other under pressure will eventually crack at the edges.
Backlit LED Mirror Integration
A wall-to-wall mirror is functional on its own. Add edge or back lighting, and it becomes something that looks genuinely designed. The effect — soft light bleeding out from behind or around the mirror — is simple to achieve and works well in bathrooms, bedrooms, and home gym spaces.
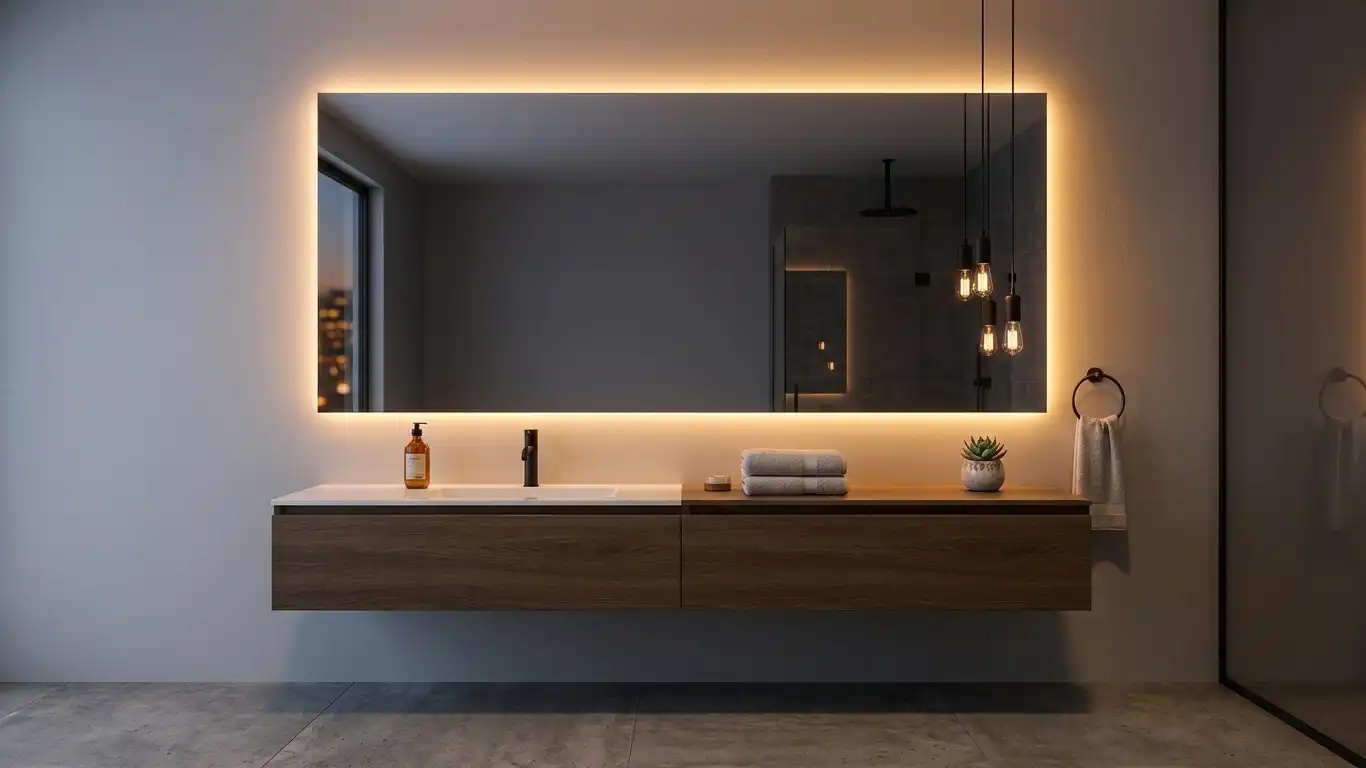
How Backlit Mirrors Work
There are two approaches. The first is an integrated LED mirror — a product where the lighting is built into the mirror itself, usually around the perimeter or as a uniform backlit panel. You buy it, mount it the same way as a standard mirror, and connect it to power. The second is a DIY approach: a standard mirror with a separate LED strip light added behind or around it.
For a detailed walkthrough of adding LED strip lighting to an existing mirror, How to Add LED Lights to the Back of a Mirror covers the process step by step.
Choosing the Right Light Temperature
Color temperature makes a bigger difference than most people expect:
| Light Temperature | Kelvin Range | Best For |
|---|---|---|
| Warm white | 2700–3000K | Bedrooms, living areas, cozy atmosphere |
| Neutral white | 3500–4000K | Bathrooms, dressing rooms, accurate color |
| Cool / daylight | 5000–6500K | Gyms, task lighting, alert environments |
For bathroom vanity use, neutral white (around 3500–4000K) renders skin tone most accurately for grooming. For gym walls, cooler light keeps the space feeling energetic. Warm tones are purely atmospheric.
If you’re browsing purpose-built options, the LuckMirror LED Wall Mirror and LED Bathroom Mirror ranges offer integrated lighting with various color temperature options and size configurations.
For how to position lighting above and around a mirror, Lights Over Mirrors in Bathrooms provides practical guidance on fixture placement and spacing.
Bathroom Electrical Safety
This matters especially if you’re running new wiring in a bathroom. Any outlet or fixture within the bathroom must be on a GFCI-protected circuit. Keep at least 600 mm of horizontal clearance between any electrical fitting and a water source. Hardwired LED mirrors should be installed by a licensed electrician — the cost is modest and the risk of getting it wrong is not worth the savings.
Plug-in LED mirrors are the simpler path if you have a nearby outlet and don’t want to open walls. Most of the backlit options designed for bathroom use are plug-in with a cord that routes to a recessed outlet behind the mirror or along the wall.
Dimmable and Smart Controls
Most modern LED mirror systems — and aftermarket LED strips — support dimming. A standard wall dimmer switch compatible with LED loads is an inexpensive upgrade that changes how you use the light throughout the day. If you’re already running smart home devices, there are Zigbee and Z-Wave compatible LED controllers that integrate with Alexa or Google Home.
Motion-activated lighting (useful in hallways and storage rooms) and mirror defogging heating pads (a bathroom luxury) can both be tied into the same circuit as the mirror lighting if you’re doing a planned install from scratch.
If you want a complete look at what’s available in purpose-built LED options before committing to a DIY approach, the Best LED Mirror Selection Guide for Bathroom Upgrades is a useful starting point.
Summary
Wall to wall mirror installation comes down to four things done in the right order: choosing the mirror type that suits your space and safety requirements, measuring and planning the layout carefully before you buy anything, understanding what your wall can actually hold, and selecting a mounting method that matches the mirror’s weight and your tolerance for permanence. The installation itself is slower than it looks — mostly measuring, marking, and waiting for adhesive to cure — but there’s little that can go wrong if the prep work is solid. For anyone adding LED backlighting, integrated products are the simplest route; a strip light retrofit is a practical DIY alternative if you already have a mirror you like. Get these pieces right and a wall-to-wall mirror is one of the more rewarding home improvements you can do — the visual change it makes to a room is immediate and lasting.
Frequently Asked Questions
How do you install a wall to wall mirror on drywall without hitting studs?
Use heavy-duty toggle bolts or molly bolts rated for the mirror’s weight. For a 60-lb glass panel, use anchors rated for at least 80–100 lbs each, placed at two to three points along the top edge. The bottom J-channel also takes a significant share of the load, so anchor it with as many screws as possible — into studs wherever the spacing allows.
What is the best adhesive for wall to wall mirror installation?
Use a neutral-cure, solvent-free mirror mastic — not regular silicone caulk or construction adhesive. Products containing acetone, toluene, or acetic acid will corrode the silver backing and leave permanent black staining. Check the product label specifically for the words “mirror safe” or “neutral cure” before using it.
How much does it cost to install wall to wall mirrors in a home gym?
Materials for a full gym wall — several 48″ × 72″ frameless panels — typically run $800–$2,500 depending on glass quality and source. If you hire a professional glazier, add $200–$600 for labor on a standard one-wall job. DIY hardware and adhesive for the same project usually costs $40–$80 on top of the mirror price.
Can you install a floor to ceiling wall mirror on a tile wall?
Yes, but it requires care. Use a diamond-tipped drill bit at low speed with water cooling to drill through tile without cracking it. Mirror mastic also bonds directly to clean, smooth tile — which avoids drilling entirely and is often the cleaner option. Make sure the tile is fully bonded to the substrate behind it before loading it with mirror weight.
How do you get a frameless wall mirror to sit perfectly level?
Start with a precisely leveled J-channel or bottom support rail — a laser level makes this straightforward even across a long wall. Once the mirror is positioned, check the face with a level before the adhesive sets or the top clips are tightened. Adjust within the first few minutes if needed. The J-channel neoprene pads give you a small amount of tilt adjustment. Getting the bottom support level first means the mirror will be level by default.